Yes, indeed. The wonky water heater, cobbled together from old gas bottles, made the trip from Scotland to the tiny house in France. I used it every day for a period of about 3 weeks and I’m pleased to say that it performs as expected. Perhaps even better than I had hoped for.
Installation
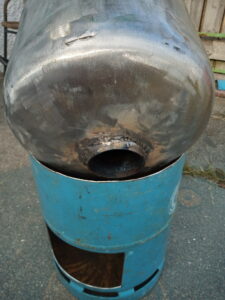
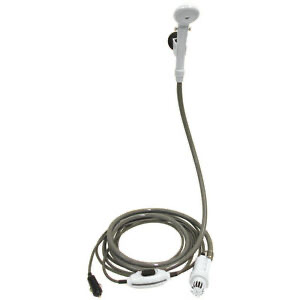
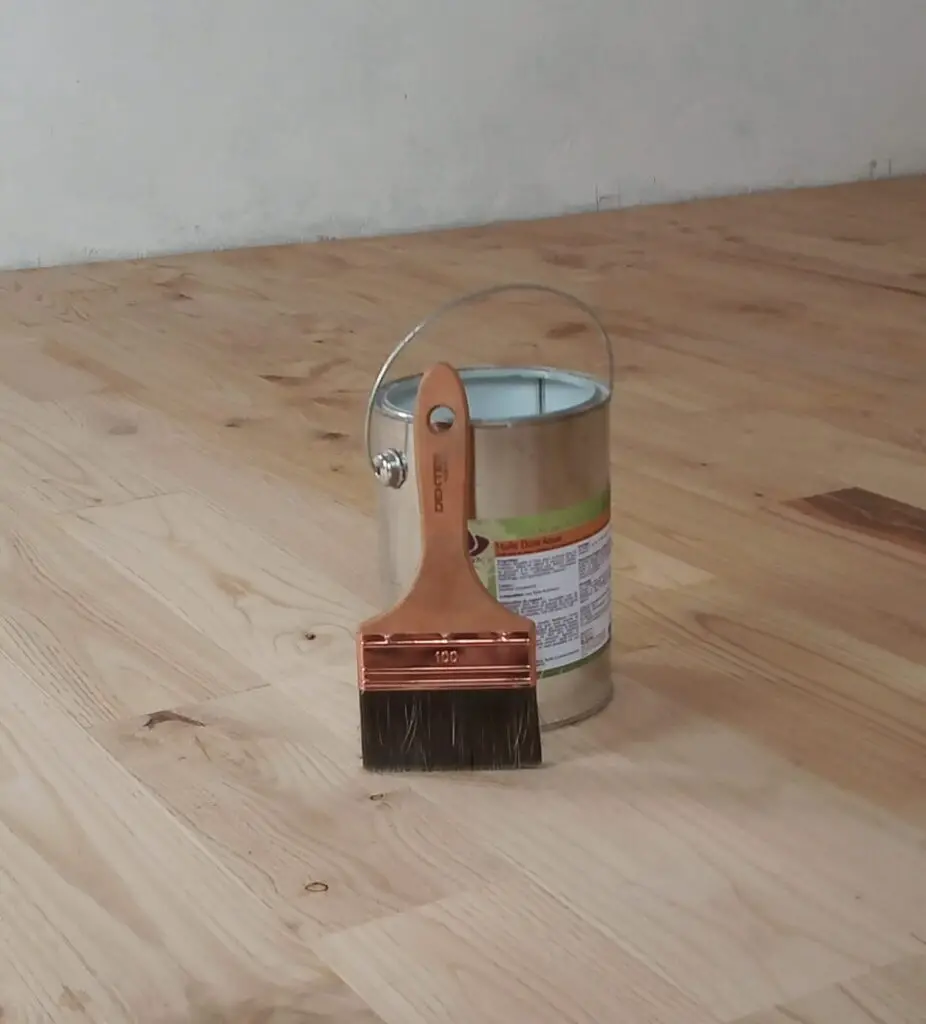
The photo above shows the water heater installed a few metres away from the tiny house.
One addition to the heater was the home made ‘spark arrestor’ fitted to the top of the flue. It is actually a steel mesh pen/pencil holder (cost 0.69 Eur!). I don’t know how well it really works as I did see the occasional spark escape. Maybe it would have been worse without it.
You can just about see the copper ‘tails’ from the heat exchanger coil connected to the red plastic pipe. It wasn’t too difficult to find the fittings to join the UK 10mm copper microbore pipe to the 12mm PER plastic pipe (PEX in the UK).
The red plastic pipe came covered in protective conduit, so the pipe was simply laid on the surface of the ground for the duration of my summer stay.
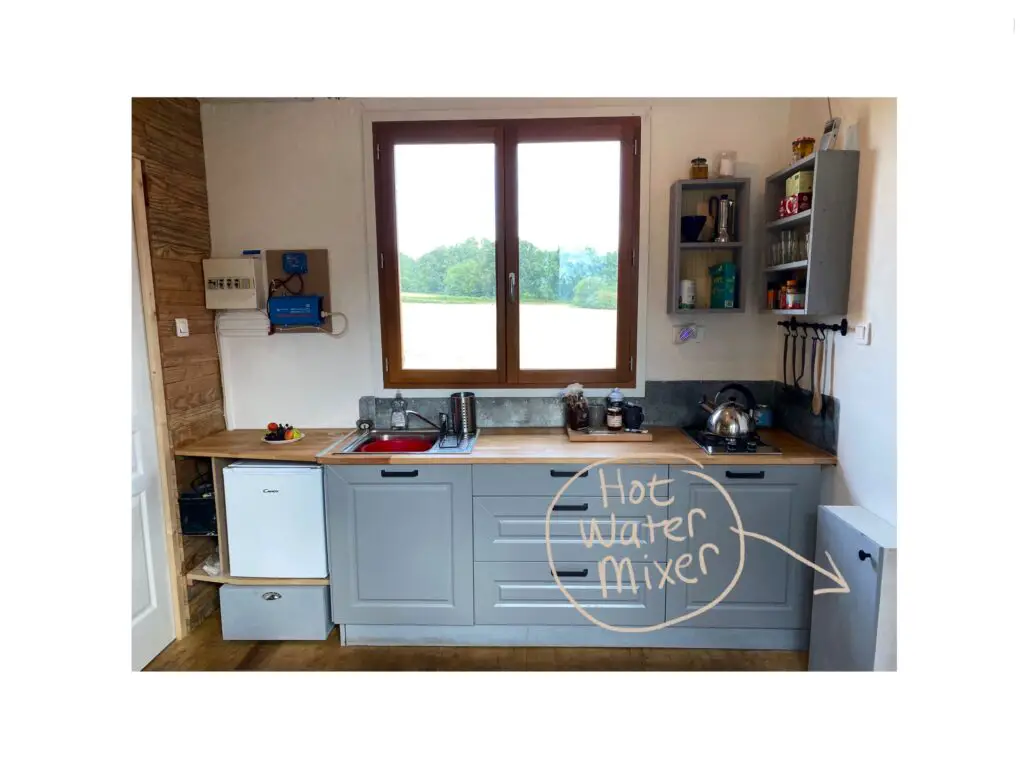
At the other end of the plastic pipe I connected short sections of 14mm diameter copper pipe (I used this size of pipe throughout the house). These sections went up through two holes drilled in the tiny house floor. These were then connected to my hot water mixer valve system, via flexible pipes, as shown below.
Hot water mixer valve plumbing
1
Mains water in
2
Feed to outside garden tap
3
Cold feed to mixer valve
4
Thermostatic mixer valve
5
Hot feed to mixer valve (from water heater)
6
Hot water leaving mixer valve – goes to kitchen and shower room
7
Mini isolator valves for water heater
8
Cold feed to kitchen and shower room
9
Cold feed to water heater
10
Hot water in from water heater
Admittedly the plumbing ain’t pretty, but it does work. Surprisingly, none of my solder joints leaked but I did have some trouble with the isolator valves which had compression fittings. I tried using PTFE tape and using replacement olives, without finding a reliable fix. After lots of trial and error, I eventually got the leaks down to one small seep, which actually stopped after a few days.
The mixer valve controls the temperature of the hot water that goes to the kitchen sink, bathroom washbasin and shower. The valve itself cost about 34 Euros from Amazon France. It was simple to install and worked very well.
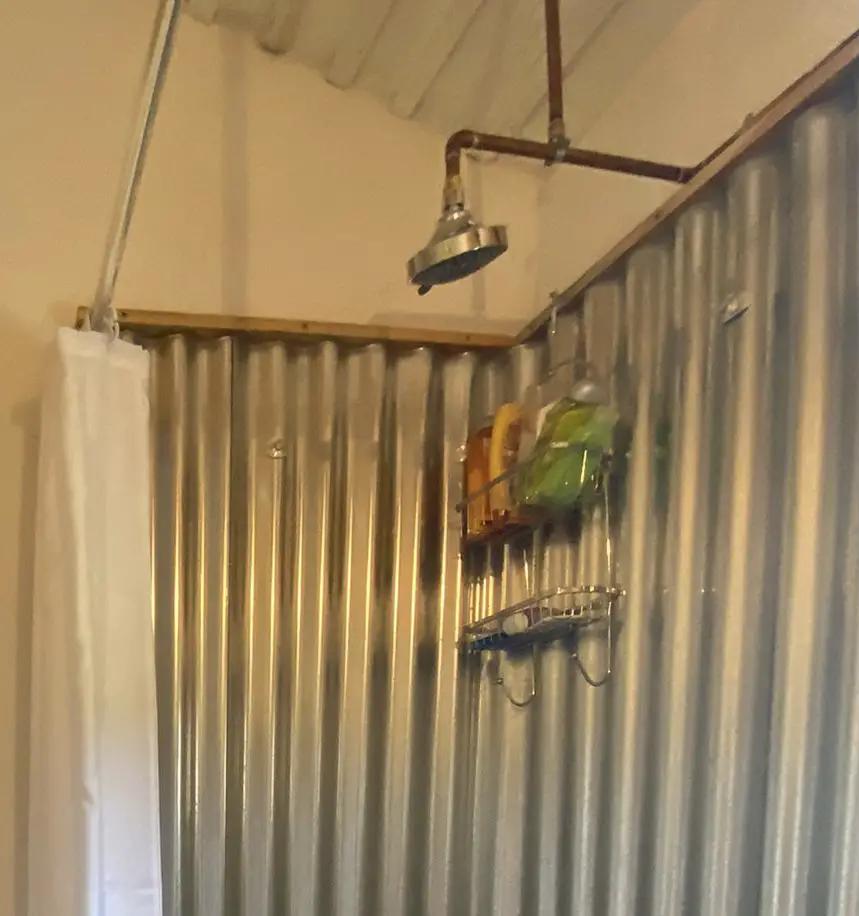
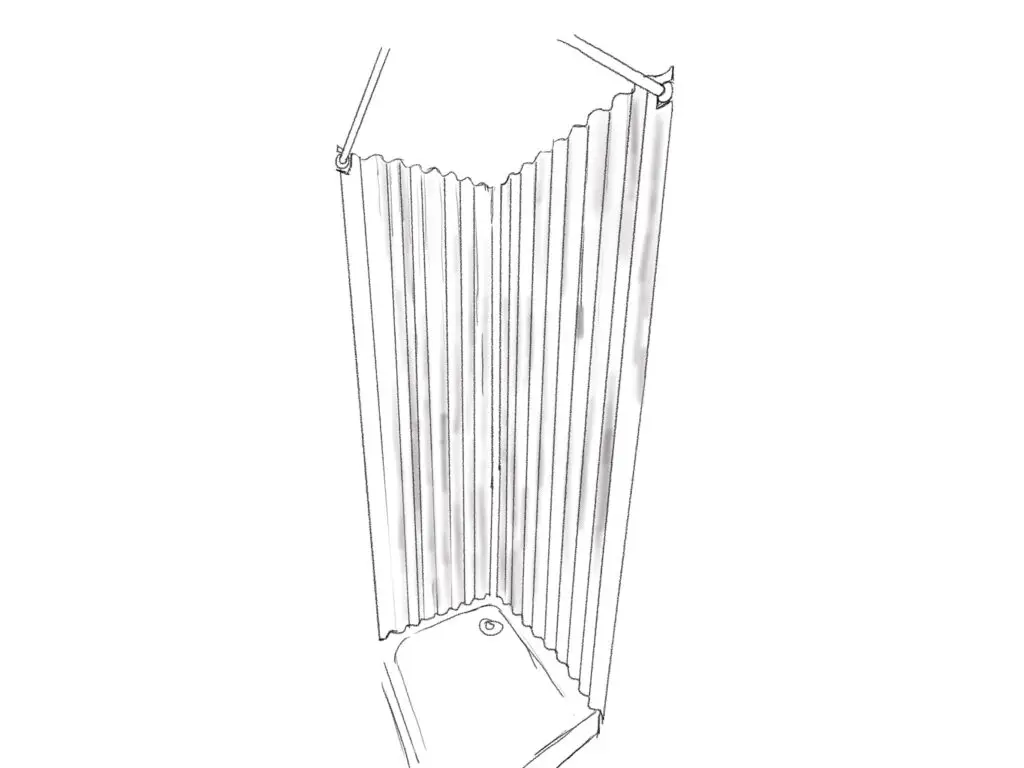
Although the sink and washbasin have mixer taps, the shower does not. Instead I installed a simple ball valve. This is the red valve next to the soap dish in the photo below. In this way, I was able to run the shower pipe neatly around the edge of the corrugated steel shower walls. This was important as I didn’t want the complexity of a conventional shower mixer which would have required holes to be drilled in the shower walls and pipes installed behind them. Another advantage of my system is that it takes up less space inside the shower, which is only 70cm square.
Tiny house shower
Operation
Operating the water heater was simplicity itself. For firewood, I have lots of small pieces of timber offcuts. These were stacked in a cross-cross fashion in the heater firebox and a gas blowtorch used for a few seconds to light it. I could also have used paper, or firelighters, were I less lazy/impatient.
Once lit, the heater smoked a bit for 5 or 10 mins then burned extremely clean. At dusk it was easy to see the flames leaving the top of the flue. Perhaps there was secondary combustion happening in the flue? In any case, it was something of a shame to see this wasted heat. In retrospect a taller thermal store (from a larger gas bottle) would have enabled me to make use of this energy.
Anyway, by the time I had cleared my tools away at the end of the day, the water was up to temperature (70-90 deg C) and I could have a well earned shower!
I found that an indicated setting of 35 deg C on the mixer valve gave a good temperature for showering and washing up (I’ve no idea what the actual water temperature was). Once set, it was not necessary to change it.
It takes perhaps 20 or 30 seconds for the hot water to arrive at the shower head. The little ball valve allows the flow rate to be easily adjusted. With a ‘medium’ flow rate, the shower temperature is maintained without a problem for the length of the shower. This was a nice surprise given the small size of of the copper coil heat exchanger.
I was often in the tiny house alone, so I could afford to be quite indulgent with the length of time spent in the shower and the amount of hot water used. With more care, it should be possible to have 2 or 3 showers without needing to add more firewood. Not that adding a few more sticks and waiting 15mins would be any great hardship.
One final point: in order to hide the messy plumbing, I boxed in the mixer valve system and added a door. This was painted a similar colour to the kitchen units and a small black knob added. Now it looks quite neat and unobtrusive.
Hot water mixer ‘cupboard’
Final thoughts
I am really pleased with the water heater – it was such a thrill to get hot water from the tap and see that my crazy idea actually worked!
Although I have no complaints about the performance of the system, there are some improvements that could be made. Fitting some insulation to the thermal store is the most pressing. At the moment it is an effective radiator and loses heat quite quickly.
Another thing I may do in future is fit a flue damper. This might reduce some of the heat being lost up the flue. I suspect that when the fire gets to the glowing ember stage, it would be good to be able to close off the flue so that more of the residual heat is used for water heating.
I’m not sure if it is worth insulating the firebox. Yes, it does lose some heat but it is also quite nice to sit outside next to this fire with a cup of coffee. I imagine in the colder seasons this could become a daily ritual :-). When the firebox door is opened the radiant heat can be felt some metres away.
Unsurprisingly, the water in the thermal store became quite orange and rusty. The gas cylinder and flue are, after all, just made from mild steel. Sooner or later a rust hole will appear. I guess, at that point, I’ll just have to patch it up. I’ve no idea if adding corrosion inhibitor to the water would really help. As it’s not a sealed system it does need to be regularly topped up to replace the water that has evaporated, so I’d be continually adding corrosion inhibitor too. At about £14 per litre, that’s not ideal. What would be ideal is a stainless steel thermal store and flue. If I were to go down that (expensive) route, I would be as well buying a commercially available wood burning water heater and adding my own heat exchanger, if needed.
A final, final point is that I still intend to build a solar water heater to be used in conjunction with the wood burning heater. Time defeated me during this summer’s build (2021) but it’s something I hope to return to in future.
Update – 2 Years later (2023)
So – does the wonky water heater still work?
The answer is … Yes, it does! It has suffered some damage though. The temperature sensor got smashed in storage and my poor welding meant that the lid became detached from the hinge (now it just sits in place). There is also a very slight water leak where one of the plastic pipes connects to the heater. It’s also quite rusty inside (to be expected).
But despite the above I can still connect it up in about 10 minutes, fire it up, and have a hot shower in less than an hour.
It does seem a bit crazy though during the baking hot French summer to be burning wood in order to have a shower. A solar heated system would make more sense. Also, if I am on my own, I will sometimes just use my Hozelock pump up portable shower with hot water heated from the gas hob or from a kettle placed on the wood burner. That way I can keep the firewood for room heating.
In conclusion, despite it’s crudeness, the water heater is still a useful piece of kit. It was also a fun project and it shows what can be done with some recycled stuff and imagination.
In this post I’ll describe how I chose and installed a new wood burning stove and flue system in the tiny house for less than £700. I’ll give a breakdown of the costs and share my experience of the stove’s performance.
Why choose a wood burner?
As my tiny house neared completion it was time to install a heating system so that I could (hopefully!) use the house during the colder months.
A wood burning stove was the obvious choice, for the following reasons:
1. Simplicity and reliability
A wood burning stove is as simple as it gets. No need for electricity, circuit boards, pumps, burners, sensors or any of that stuff.
2. Availability of fuel
I have a fair amount of scrap timber left over from the build that could be used as firewood. It is only softwood (Douglas Fir) but is dry and free from chemical treatment. As I don’t live in the house full time, I’m sure it would last for quite a while.
I’m also lucky in that the house is located in an area which is wooded and good quality firewood (seasoned hardwood logs) are readily available.
3. Renewability
While it may not be perfect, wood is at least a renewable resource. That’s assuming we can consume wood fuel at an equal (or slower) rate than the rate at which it grows. I’ve no idea if this is true in my region, country or at international level. But I think it should be possible. It’s certainly more achievable than waiting 50+ million years for some more oil to be formed.
4. Comfort
I admit to a hankering for the cosy comfort of a wood burning stove. One of my dreams is to escape the madness of the festive season by retreating to the tiny house at Christmas. There I could spend my evenings with a glass of whisky, a book and a few logs crackling in the stove. Bliss!
5. Cost
The absolute cheapest method of heating the tiny house, in the short term at least, would have been to continue with a paraffin heater. It’s not very pleasant though, as it does give off some odours and a bit of smoke. Longer term, I suspect that the cost of buying drums of paraffin would be greater than that of using firewood.
Buying and fittng a wood burning stove requires some up front investment. However, the ongoing heating costs using firewood in a stove are said to be lower than using gas, electricity or oil.
To be honest, I didn’t investigate the initial costs of a gas or oil powered heating system. I didn’t want the complications of these systems or the fact that they are non-renewable energy sources.
As for electricity, this could be quite a cheap install (one or two panel heaters) but, as I am off grid, it was never an option anyway.
To summarise, I haven’t done any detailed calculations regarding the overall cost of heating with a wood burner vs the other options. That’s partly because the other options have been ruled out for other reasons. In any case, the accepted wisdom is that using wood in a modern wood stove is an economic method of heating. In a small space such as the tiny house, I’m confident the annual costs will be low.
6. Heating/Cooking
It’s possible to heat water or even cook on a wood burning stove, depending on the model. Very handy!
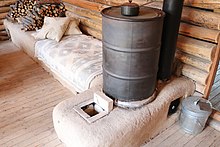
Choosing a stove – A Rocket Mass Heater?
My initial plan was to build what is known as a rocket mass heater (RMH), an example of which is shown below.
Typical rocket mass heater
This is a hybrid of a rocket stove and a masonry heater. Fascinating though they are, a full explanation of these systems, and the various types of RMH, is beyond the scope of this post. If you would like to know more about them, the Wikipedia page provides a good introduction.
Without going into the technical details, the advantages of a RMH are:
Much more efficient than a normal wood burning stove (uses less wood for the same heat output)
Burns very cleanly
Only has to be fired a few times per day – after which a comfortable heat is radiated over a period of several hours by a large thermal mass.
I did a lot of research into RMH’s and spent some time designing one for the tiny house. I even bought some materials for its construction, such as high temperature glass, insulation and steel. However, I decided to abandon the idea of a RMH for the tiny house for the following reasons:
Weight Concerns
Mass heaters are, by nature, heavy things and I was worried about the effects of constantly increasing the weight of the house. Firstly, I didn’t want to overload the timber floor and secondly I didn’t want to add significantly to the load carried by the foundations.
Lack of space
I had already managed to squeeze quite a lot into my 17m2 floor area. Trying to add a bulky mass heater seemed like a step too far.
Lack of time
The whole house had been something on an experiment (a fairly successful one, so far) and I was not averse to a novel heating system. However, I wanted to install the heater in my usual 5 week summer holiday period. As I also had a bathroom and hot water system to install, I simply didn’t have the time to build an experimental RMH too.
So my focus then turned to finding a ‘good enough’ conventional small wood burning stove.
Criteria for a normal wood burning stove
Price and availability
As ever, I was on a tight budget. I couldn’t justify a super fancy stove for my rustic tiny house. So I was looking for something simple and inexpensive. Getting a second hand stove could have been a good option but I didn’t think I’d find one locally that was small enough. I also needed one quickly and couldn’t depend on one becoming available during the few weeks that I was in France.
Delivery
Ideally, I wanted the stove to be located in mainland Europe so that I could have it delivered to France at a reasonable cost.
Performance
I didn’t need the stove to have stellar performance, but I didn’t want a load of junk either. I hoped to find a model with some good feedback from existing buyers.
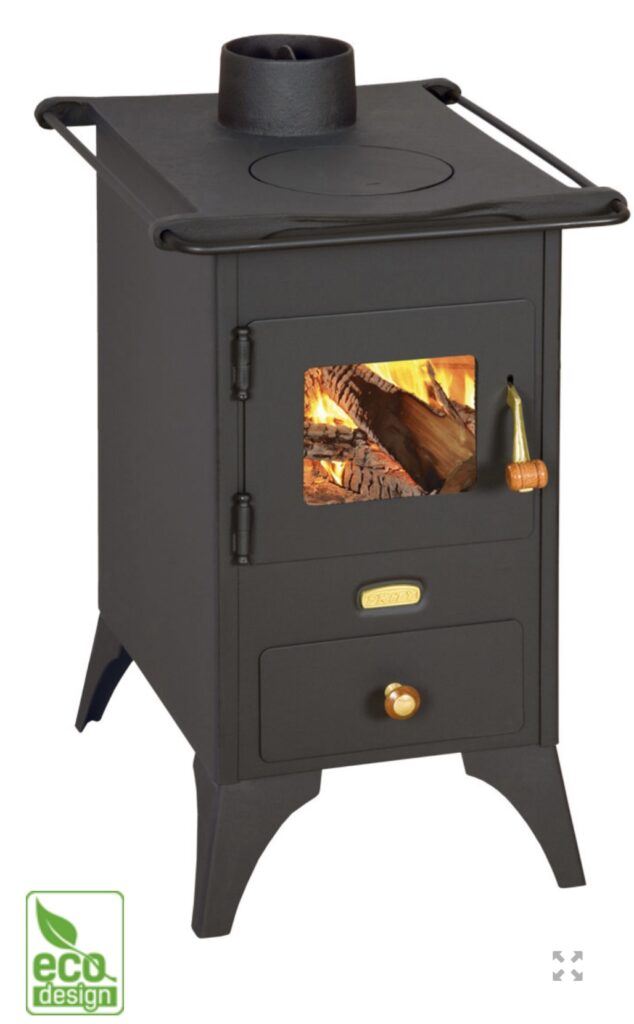
After some deliberation, I decided to go for this Bulgarian made wonder, the Mini, made by a company called Prity. At about 300 Euros (£260), including delivery to France, it offered much cheapness. It was also in stock and had generally favourable reviews.
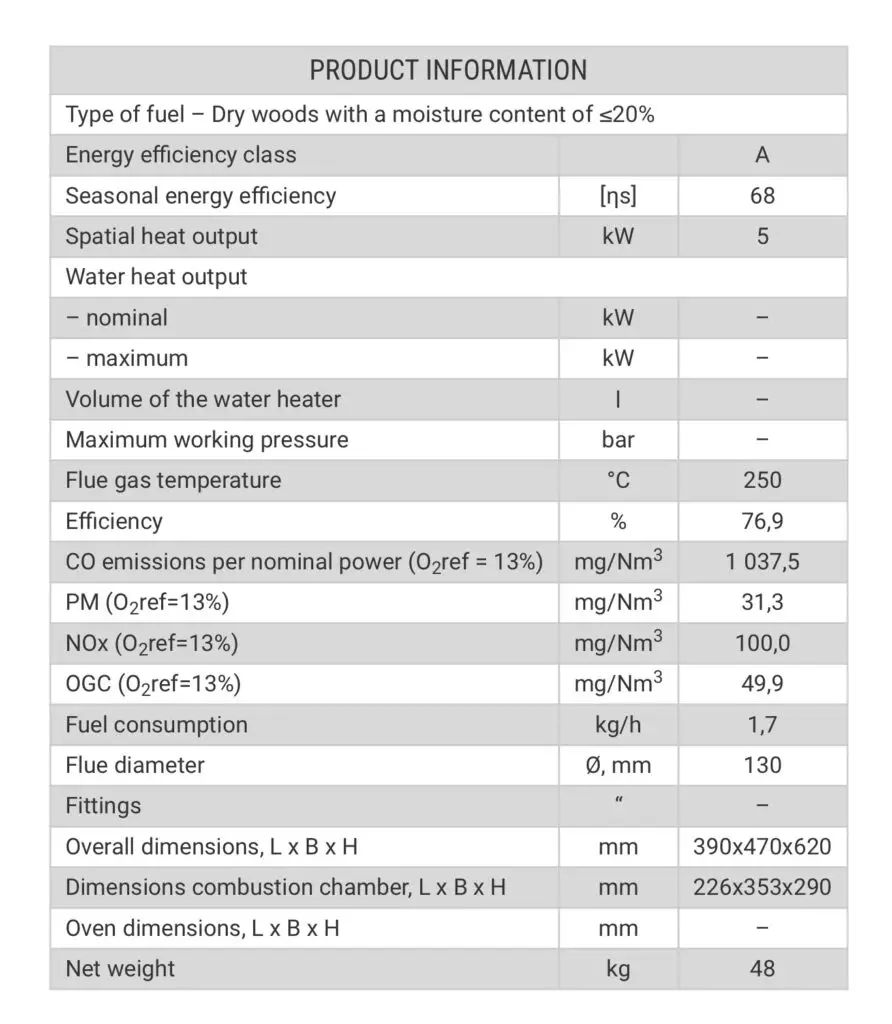
The 5kw output is OK for surfaces up to 30m2 (perfect) and it’s compact and not too heavy (48kg). It has a cast iron top with one heating plate and is lined with fire bricks. These provide some thermal mass and prevent damage to the steel sides. The full specification is shown below.
I did consider other stoves before opting for the Prity Mini. As far as buying one in France goes, I couldn’t find anything small, cheap and available that I could buy ‘off the shelf’ and install myself.
The choice of small (5kw) stoves available in the UK seems to be quite good although they are, unsurprisingly, more expensive than the Prity. One stove that caught my attention was the famous “Hobbit” by Salamander Stoves. With a 4kw output, this nice little stove is almost as powerful as the Prity and is more efficient (81.4%). However, it does cost more than twice as much (£625) and has a 14 week delivery time. There would also have been the cost and hassle of delivery to France, especially now that the UK has left the EU.
Prity Mini: Order, delivery and first impressions
I ordered the stove from the the French eBay site and got it delivered to a friend’s house. It was sturdily packed in a wooden crate and, at 50kg, I could lift it into my car without too much difficulty.
On opening the crate, everything was found to be in good condition. The only assembly required was to place the fire bricks into the rear and sides of the stove.
As for the quality, I was pleasantly surprised. It looked quite nice and the wood and metal door catch worked well. The door didn’t have a glass fibre rope seal and I tried to ‘improve’ it by fitting one. This made the door harder to close and, in practice, it fell off anyway (despite using the proper glue). After using the stove, I concluded that the seal was unnecessary, for reasons I will go into later.
Flue components
These various bits and pieces are essential to the safe operation of the stove but the costs can quickly mount up. I tried to get the best deal by buying them in the UK and taking them with me. All of the parts were sourced from eBay but I should point out that the sellers were established UK specialist retailers. I never had any problems with the quality of the parts. (UPDATE: Since first writing this post, some parts have increased in price and others are out of stock. This might be due to Brexit. In any case, I have left the prices as they were in 2021)
Interestingly, the Hobbit stove tiny home flue installation kit costs £485 (4” system). So my eBay penny pinching paid off!
Had I tried to buy the flue components in France, I would probably have been scratching around trying to find them and would almost certainly have had to order some bits. The total cost would have been higher too. As it was, the only extras I had to buy were a couple of 45 degree bends and a can of spray paint. I can’t remember the exact price for these items but it would have been under €50.
Fitting the new stove
And so on to the exciting bit – fitting the stove! Unfortunately, this also meant doing some boring research on how to do it safely.
Somewhat lazily, I consulted the UK regulations rather than the French ones. No-one is going to come and inspect the installation anyway. Obviously I have a strong personal interest in not burning my house down or getting carbon monoxide poisoning, so wanted to reduce these risks as much as possible.
The basic idea is to keep combustible materials a safe distance away from the stove and the flue pipe. There are also rules about the layout of the flue pipe, the materials used, the height of the flue cap above the roof ridge and the supply of combustion air to the stove.
Stove Location
This was the first thing I had to consider and it was a bit of a headache.
One constraint was that the flue pipe obviously had to pass between the roof joists before passing through the roof tiles and this affected where the stove could be placed on the ground. Another constraint was that I wanted the stove to be close to the gable end wall (but I couldn’t have it too close, for safety reasons).
According to stovefitterswarehouse.co.uk the distance from the stove to the wall for small stoves (less than 7kw) can be as little as 120mm, if a metal heat shield is used. Otherwise the distance depends on the manufacturer’s specifications, which could be around 400mm or more.
I decided to make a heat shield from a sheet of aluminium I found at a local DIY shop. It was already the perfect size so no cutting was required. Interestingly, the rules say it should be made from Galvanized steel. I couldn’t think of a good reason as to why this would be preferable over all other metals.
The sheet was spaced from the wall with 25mm lengths of 14mm dia copper pipe and fixed using screws with large washers under the screw heads to avoid damaging the shield. The theory is that the sheet becomes hot and that the air around it rises, to be replaced with cooler air and so on. In this way there is a constant current of cooling air behind the stove. It’s likely that the shield helps reflect some heat back into the room although I can’t say for sure if it actually does.
The heat shield can be seen in the picture below.
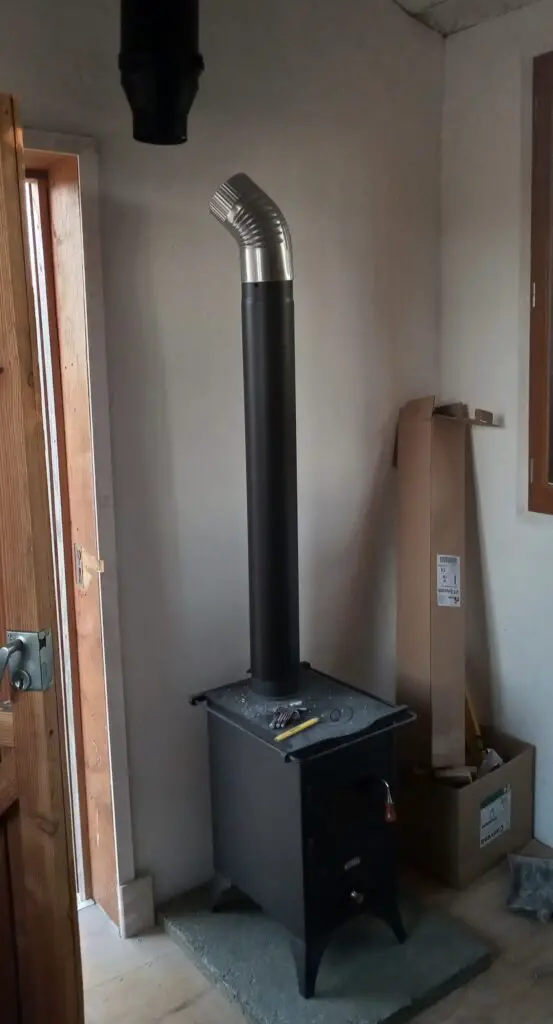
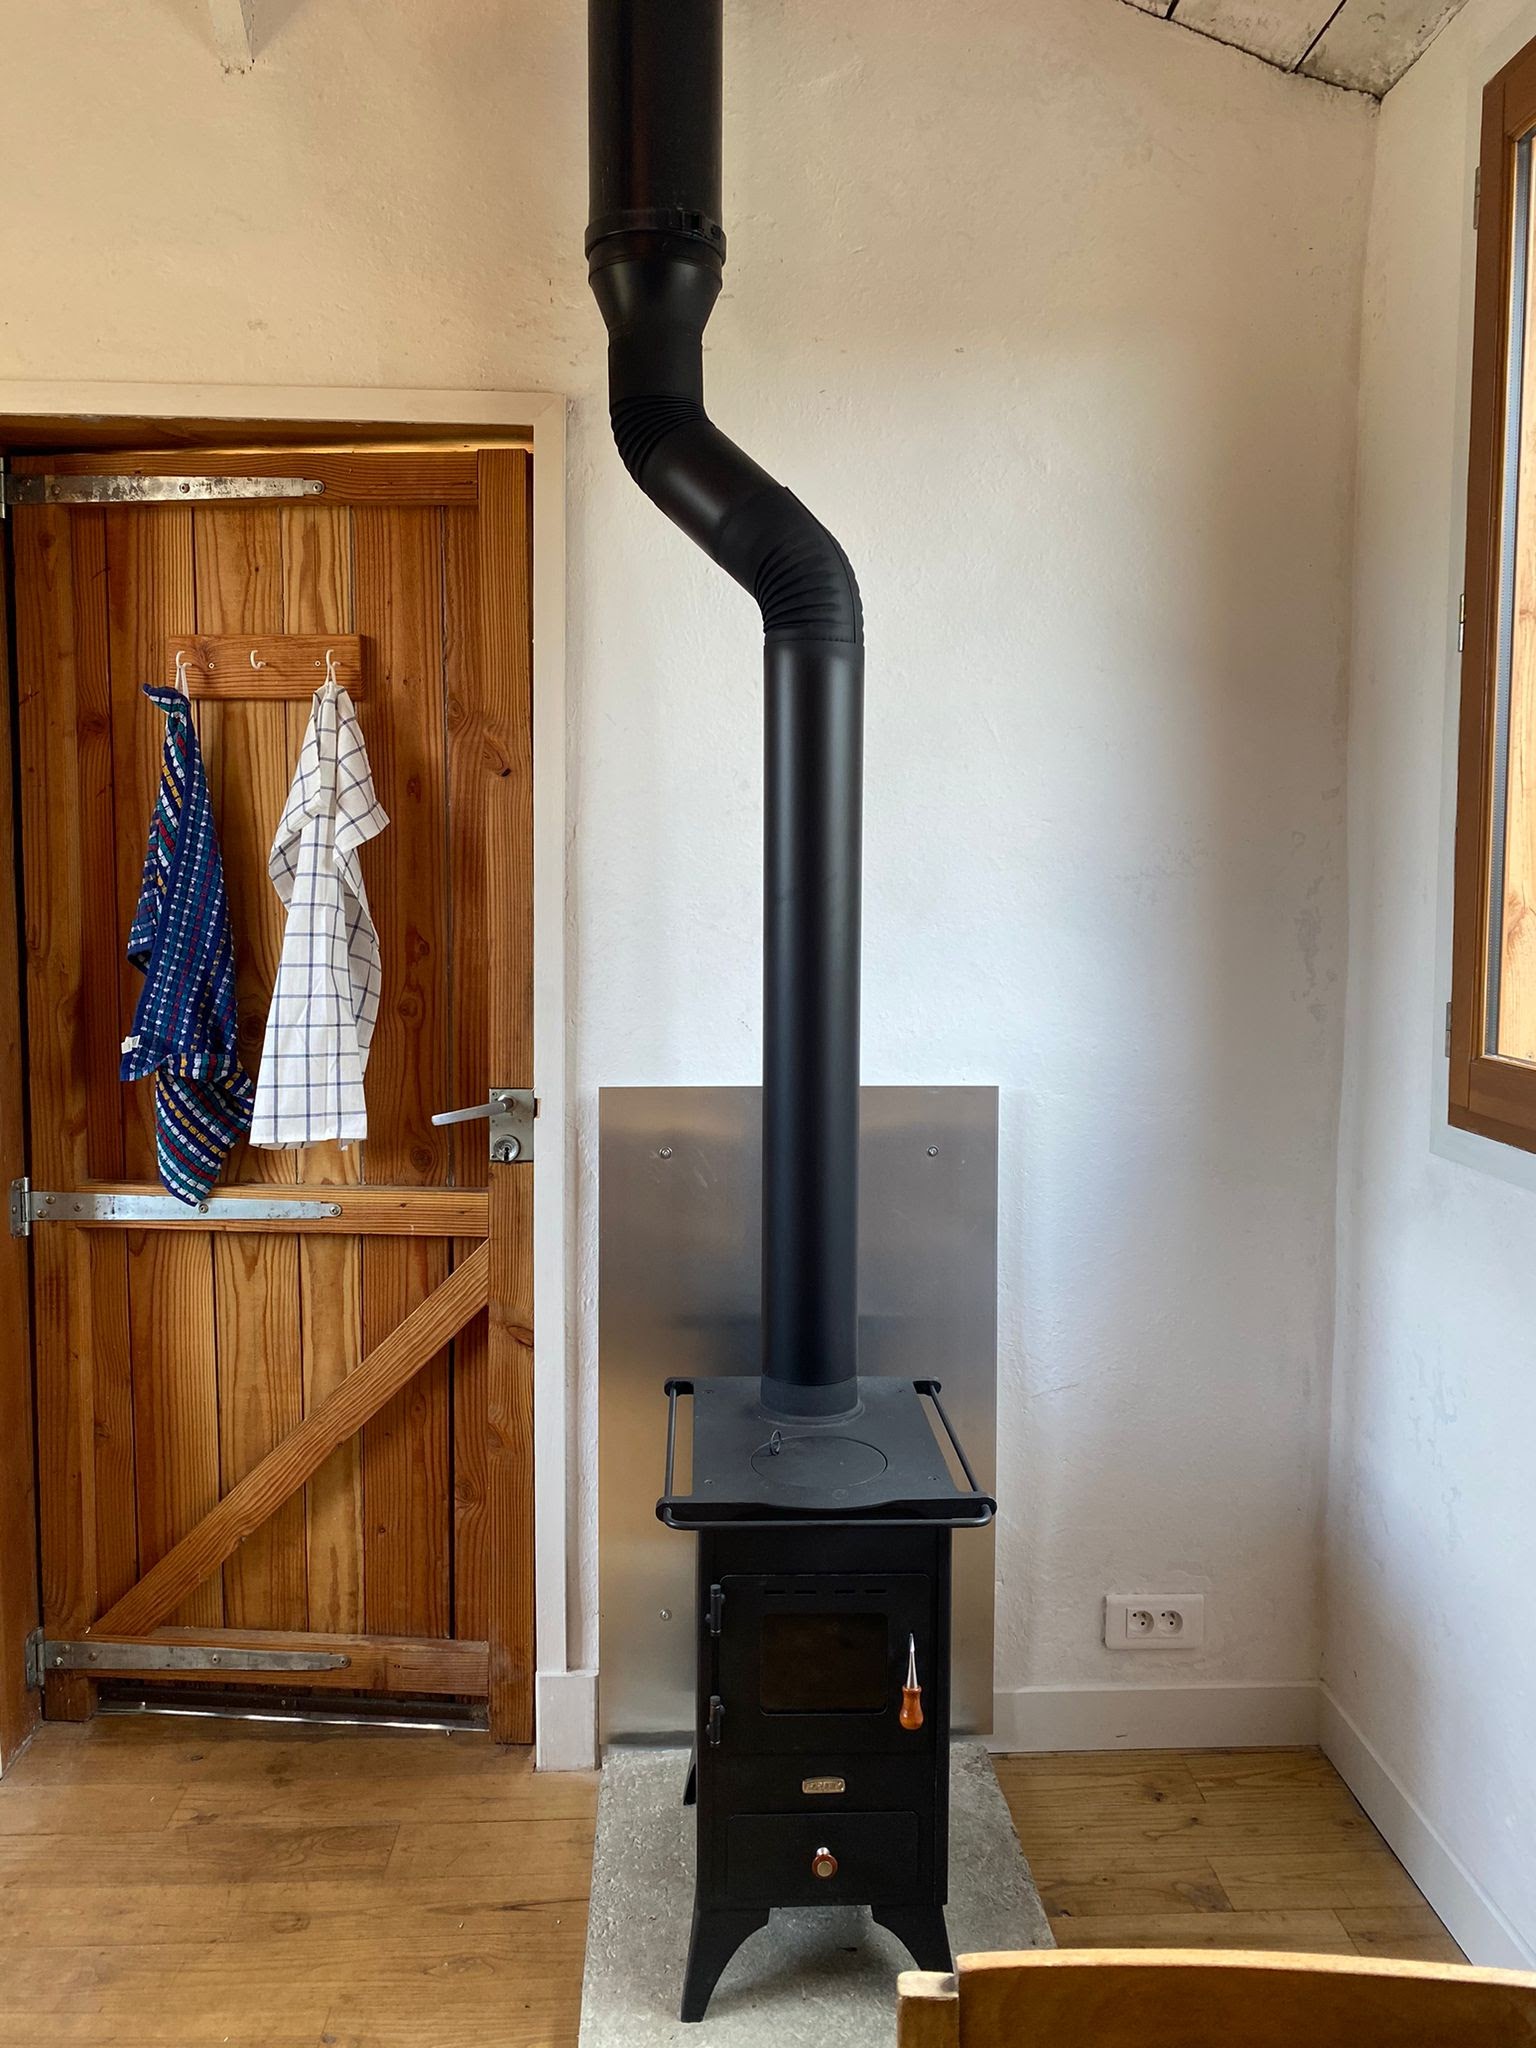
Prity Mini wood burning stove with hearth and wall shield
Hearth
It’s necessary to sit the stove on some kind of protective hearth. This is especially important in my tiny house with its timber floor.
According to directstoves.com, the hearth for a free standing stove should :
Extend at least 300mm to the front and 150mm either side
Be at least 12mm thick
Be made from non combustible materials
Cover a minimum area of 840mm x 840mm
Alas! A minimum area of 840 x 840mm was impractical in the tiny house. It would have taken up so much floor space that it would have been a trip hazard.
Instead I made a hearth that extended a ‘sensible’ distance past the rectangular form of the stove. I didn’t see a problem with this, unless I was going to make a habit of letting burning logs spill out of the stove, which I wasn’t.
I chose to cast the hearth from hempcrete (see picture above). This cost me nothing as I had the material left over from the build. It’s also non combustible and looks ‘good enough’. You could tile on top of it if you wanted something more aesthetic. Casting the hempcrete hearth was easy, I just screwed a wooden frame to some scrap OSB and filled it with a hempcrete mix that was heavily dosed in lime. After a couple of days it was rigid enough to be removed from the mould and installed (it would harden further and become very solid with time). The thickness, from memory, was about 40mm.
The hempcrete hearth was simply placed on the timber floor and the stove put on top.
Flue Pipes
Two types of flue pipe were used, single and double skin. The single skin pipe is not insulated and gets very hot. The double skin pipe has a layer of insulation between the layers, and this reduces the temperature of the outside skin significantly.
The double skin flue pipe is used where the flue passes through the ceiling (and relatively close to the combustible wooden joists). Another benefit in using it outside is that it helps keep the exhaust gases warm – improving the draught and reducing the chance of condensation.
The single skin pipe has the advantage of being cheaper and helps radiate a bit more heat into the room. As it gets very hot, it has to be kept well away from combustible materials. In my installation it runs from the stove for a distance of about 1.5m before connecting to the twin wall pipe.
There is a point where the single wall pipe runs fairly close to the wall which isn’t ideal. Although the hempcrete is fire resistant, the potential danger concerns the timber stud frame within the wall. I think the risk is pretty low, but I could install a smaller metal shield in this area at a later date.
As far as connecting the flue pipes goes, the single skin pipes are just a push fit. I bought a tube of high temperature silicone to seal the joints if necessary but I haven’t needed to use it. The draught of the chimney seems to create enough negative pressure to stop smoke leaking into the room.
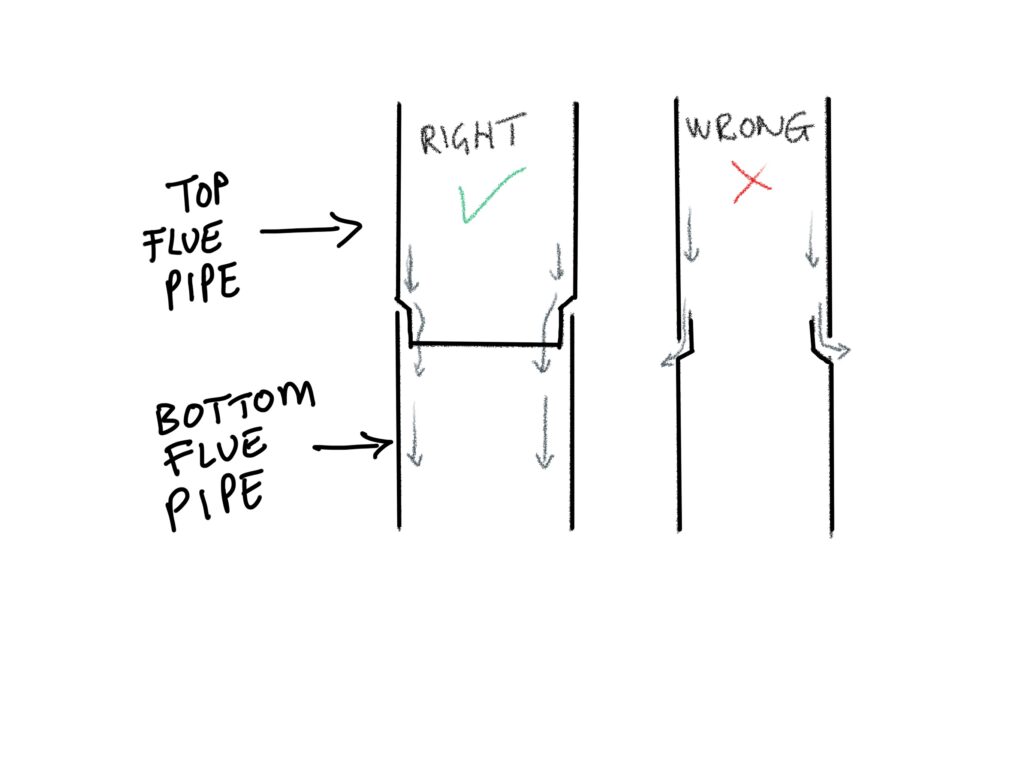
It’s perhaps worth pointing out that the pipes should be connected as shown below.
Joining single skin flue pipes
This means that any possible condensation or other gunk running down the inside of the flue pipe will not leak out through the joints.
The pipe I bought came in enamelled black and was very sturdy. Unfortunately the bends I used were a bit more flimsy and came in an aluminium colour. I sprayed them with high temperature matt black paint, which looked OK but was quite easily scratched.
In order to cut the black single walled pipe, I used an angle grinder with a metal cutting disk. I guess you could use a hacksaw instead although it would take a lot longer.
The twin walled pipes were connected by slipping the pipes inside each other and closing a latch, which tightens a metal clamping band around the pipe joint. It’s a very neat and secure system.
Ceiling flashing
Taking the flue through the roof was something that I was not at all looking forward to. I knew it would be messy and awkward and wasn’t confident about removing and re-installing the roof tiles. Furthermore, I don’t really like working on roofs and I didn’t know how I’d manage to install the last bit of heavy and awkward twin wall pipe from the roof up to the flue cap. It all seemed very easy to mess up.
At least the weather was dry and sunny on the day of the installation. I wasn’t quite so happy about the wasps that were buzzing around me on the roof (they must have had a nest nearby) but I just ignored them and they didn’t give me any trouble.
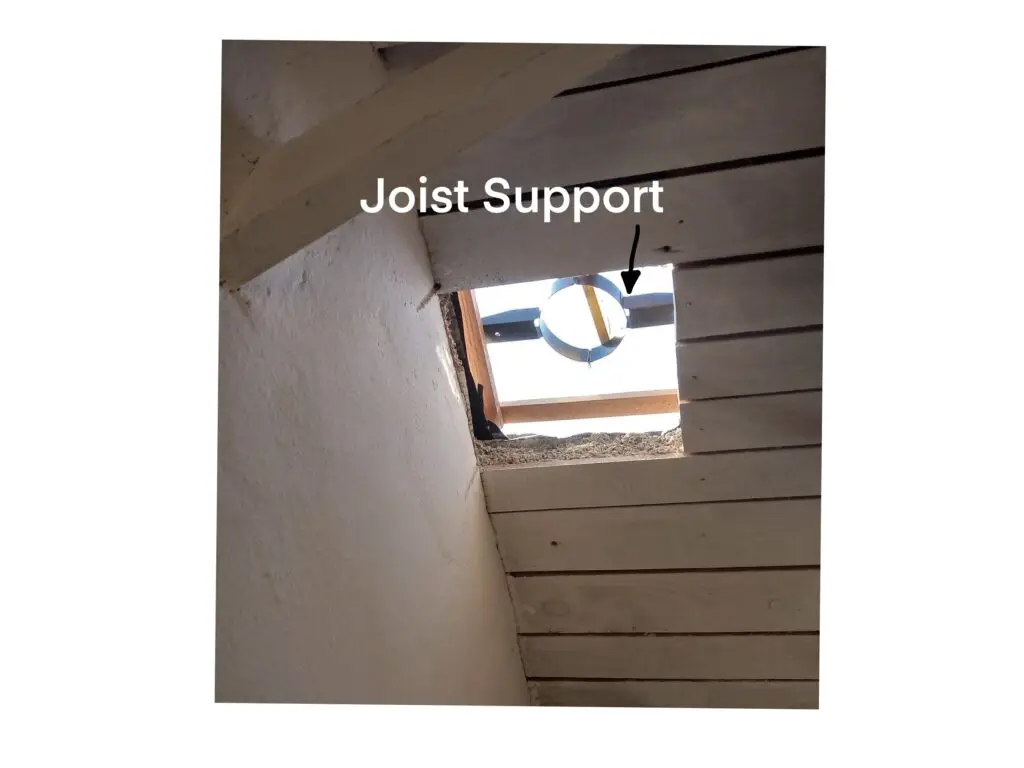
Working from the inside, I removed an area of the timber ceiling and then the lime and hemp insulation. This was the messy bit as it all fell down onto the floor. Next, I removed some tiles from the roof and cut away an area of the roof membrane. Now I had a square hole through the ceiling and roof.
The next fiddly bit was to install the joist support and the section of pipe that went through the roof. The joist support clamped around the pipe and onto the roof joists and took the weight of the pipe as it went through the roof. It took a bit of trial and error to get a solid fixing and also ensure that the pipe was reasonably vertical.
Hole in ceiling and roof for flue pipe
I tried to have the twin wall pipe passing between the rafters such that there was at least 60mm of space around the pipe, as recommended on this website.
Now the flue was through the roof, I had to add the final section of flue and I hoped this would be long enough to satisfy the requirements about the height of the flue cap. These regulations are described here. In my case the flue exited the roof less than 600mm from the ridge and so had to extend vertically above the ridge by more than 600mm. The final flue section comfortably exceeded this, so I had high hopes that the flue would give a good draught.
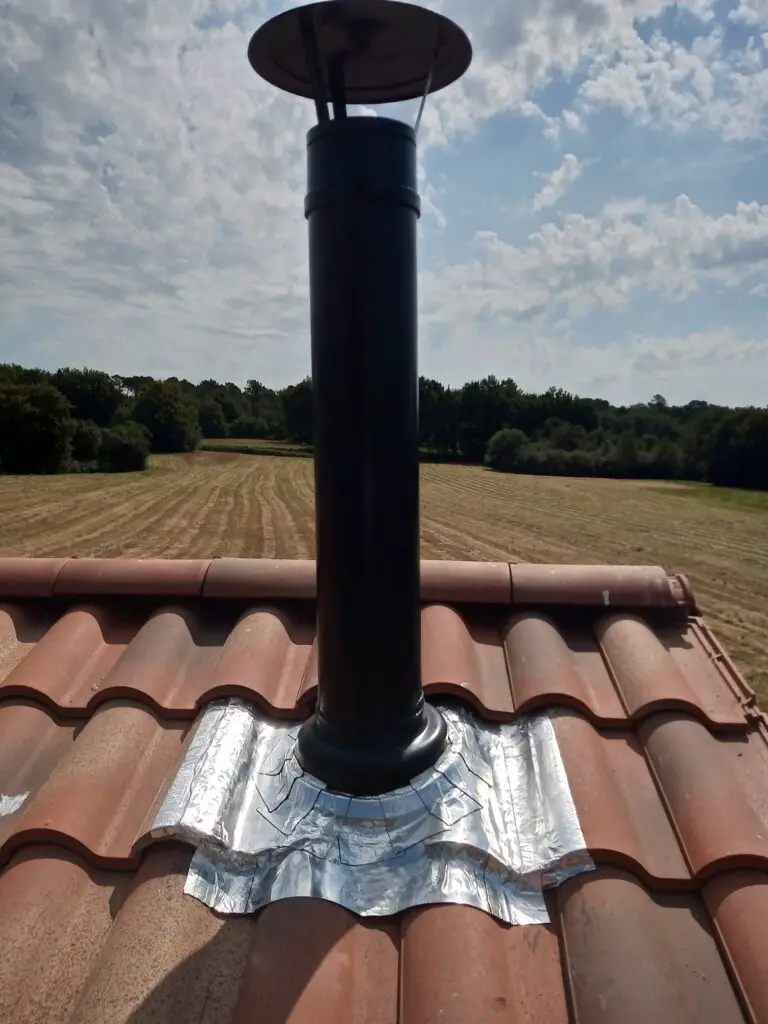
Flashing, twin wall flue section and flue cap above roof
With all of the flue sections in place, I replaced as many tiles as I could and I think I only had to cut one of of them. Then I put the flashing over the flue (lubricating the silicone rubber ring with water) and dressed the lead flashing over the tiles with a rubber mallet. The shape of the tiles were such that I couldn’t get the lead to follow the shape of the tiles completely. A small bead of clear silicone was applied between the rubber sealing ring and the flue pipe.
Being somewhat paranoid about water leaks, I added some bitumen/aluminium tape around the rubber seal and where the sides of the flashing met the tiles. The tape didn’t actually stick too well to the seal, so I later removed these pieces but left the other bits of tape in place.
The final job (on the roof side) was to clip on the flue cap (chimney hat). Very satisfying.
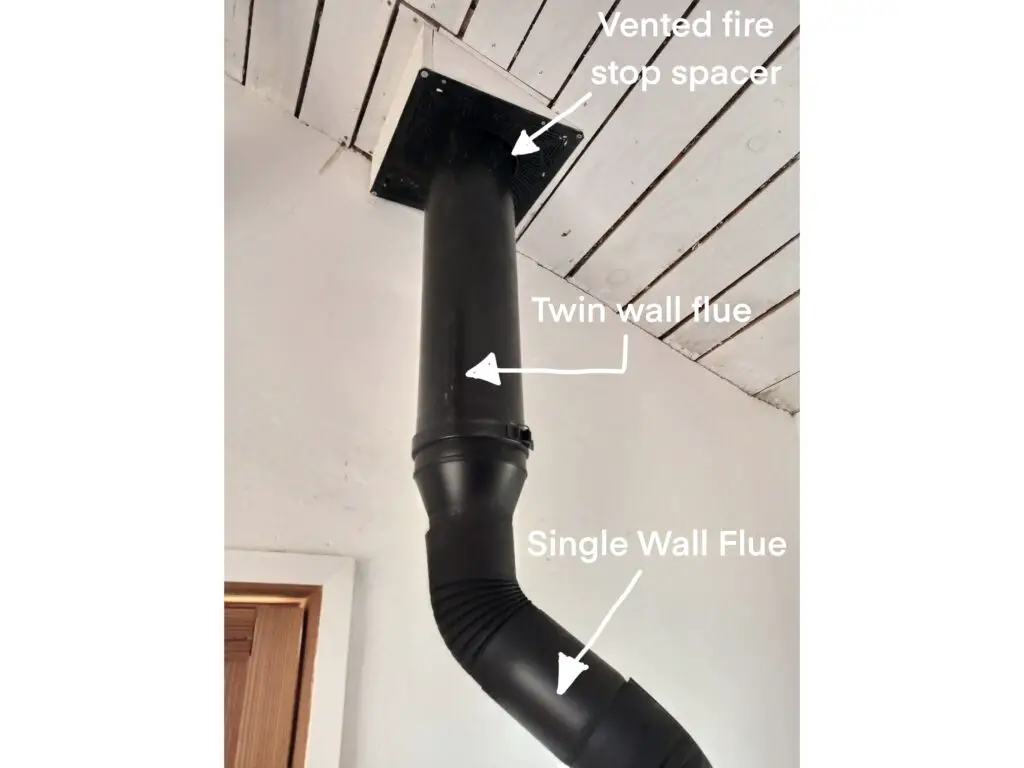
All that remained was to make good the ceiling inside the house. This involved the fitting of a ventilated fire stop spacer and some timber framing around it. As the spacer was fitted horizontally and the ceiling was sloped, this required quite a bit of fiddling around. I also had to make it fairly rigid as the spacer also helped keep the flue pipe vertical. The end result was acceptably neat (see below).
Flue pipes and fire stop spacer
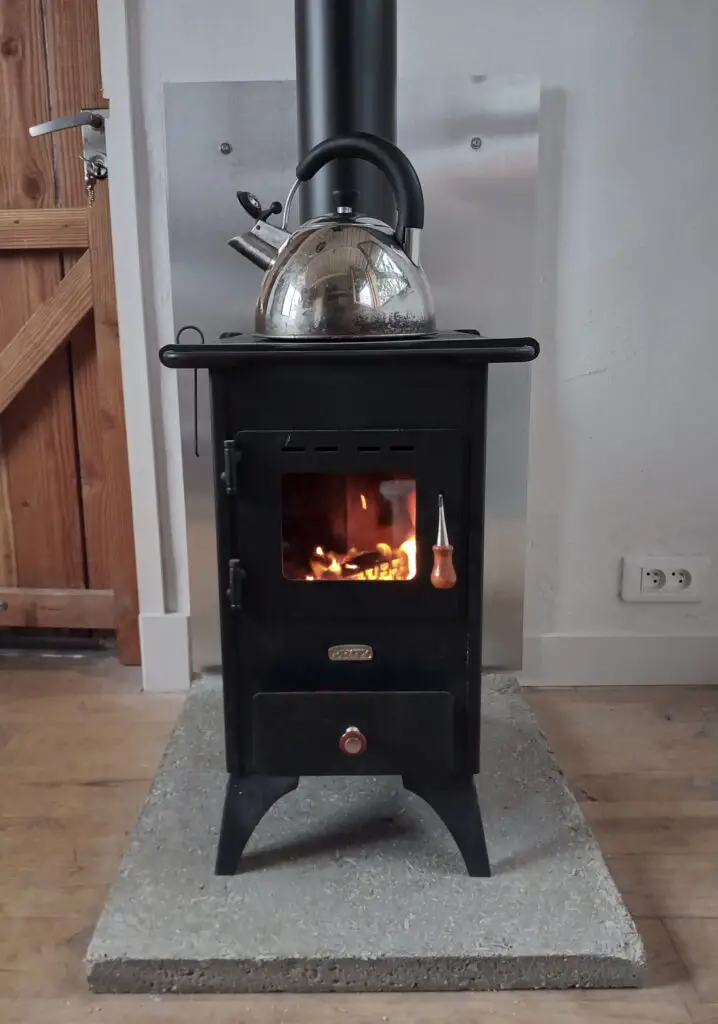
Completed wood burner installation
Does it work?
Now for the performance – is it any good?
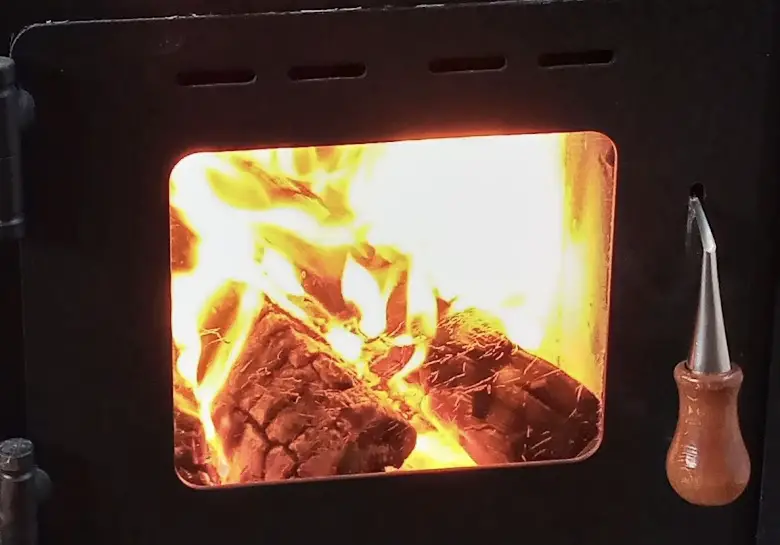
Yes, I’m pleased to say that it works pretty well. The air intake is controlled by sliding the ash drawer out slightly. This really allows the fire to light easily and burn hot (the draught is excellent). Closing the door reduces the airflow and subdues the flames somewhat and there is also a damper in the stove where the flue gases exit, for further control.
In practice, I preferred to run the stove quite hot so that it would burn cleanly. I don’t like the idea of leaving the stove smouldering overnight (poor combustion, pollution, deposits inside the flue). The hot burn requires a good intake of air and the previously mentioned lack of door seal is of no consequence.
The stove was used for a period of one week in October. During this time it was quite mild in the afternoons (about 15 deg C) but chilly in the mornings (0-5 deg C).
With the stove about half full and the ash drawer open slightly, it would burn hot for about 20-30 mins. There was little visible smoke leaving the top of the flue. During this time the fire bricks would heat up (storing some heat) and I could also heat a kettle of water for washing. If I ran the stove for long enough, the kettle could be made to boil.
I found that the inside temperature of the house dropped from 20 to 15 deg C overnight. Running the stove for a 30 minute blast in the morning was enough to make it cosy again. Typically I ran the stove once or twice in the evening too.
Obviously in the winter I’d need to run the stove for a greater amount of time. Unfortunately the current Covid travel restrictions mean that I won’t be testing it this Christmas! Consequently, I can’t comment on how stove performs in the coldest months.
I don’t have a stove pipe thermometer, but I guess that a significant amount of heat is being lost up the flue pipe. In future I may try a ‘heat exchanger’ to increase the surface area of the the single wall flue pipe and extract a little bit more heat (see below).
Another possibility is to stack some bricks around the sides of the stove to add a little bit more mass. This might allow the house to stay warmer for longer after the fire goes out. It’s probably worth a try for the cost of some common house bricks.
I bought a fresh air intake kit to allow the stove to be fed with cold air from outside. This consists of a 100mm diameter flexible pipe to which I will attach two end plates (covered with wire mesh to protect against bugs and other debris). I haven’t fitted the kit yet. Until this is done, I simply open the window nearest the stove to allow the combustion air in. The window’s external shutter can be partially closed at the same time to protect against the wind and rain.
I also fitted a battery powered carbon monoxide and smoke detector for safety’s sake. These are so cheap and easy to fit that there is really no excuse for not having them. The carbon monoxide detector did actually go off when I was using the paraffin heater (I obviously hadn’t provided enough ventilation). This gave me some reassurance that the detector does work well and could even save my life.
Conclusion
Overall, I’m very satisfied with the wood burning stove. For around 800 Euros, I have a complete new system that burns well and fits quite tidily into a small living space.
According to this website, the typical cost of a cast iron wood burner, supplied and installed by a French artisan, is between 1,000 and 4,000 Euros. I suspect that in my case it would be at least 1,500 Euros (stove, flue installation, custom hearth and commissioning). So I have saved at least 200 Euros and probably a lot more.
The installation, although a little bit messy and fiddly, was not as difficult as I feared. Happily, there has been no evidence of water leaks from the flue flashing and it all seems quite safe.
So far I have only burned small pieces of well seasoned softwood and the performance has been good enough to heat the tiny house quickly. It would be interesting to see how the stove performs with hardwood logs such as Oak.
It remains to be seen how much the wood consumption would be over a year (and how much it would cost) were I to live in the tiny house full time. I suspect that the generally mild climate in South West France, coupled with the reasonably good insulation, would mean that the annual firewood bill would be low.
Update – September 2023
It’s now around 2 years since the stove was installed and, to be honest, it hasn’t seen an awful lot of use. I still haven’t been able to liberate myself from the UK during the Christmas holidays in order to give it a winter test. I have used it on chilly days in Spring and Autumn though.
The stove still works as it did when first installed. The only slight problem is a ring of rust at the top of the stove where the flue is attached. Some moisture must have travelled down the inside of the flue (despite the chimney hat). This probably happened in windy conditions. The rust is only cosmetic – I could clean it and get some stove polish to make it black again.
It’s also surprising how much wood is used when the stove is used daily for only a week! I think that one winter would be enough to finally consume the rest of my scrap timber from the house build. Admittedly, most of the wood is Douglas fir, so it does get burned quickly.
If I were able to spend more time in the house I would either buy some hardwood logs (oak, most likely) or experiment with the use of wood pellets. I recently saw a video on YouTube that give some clues as to how this could be achieved. My idea would to create some sort of cartridge or insert that could be loaded with pellets then placed inside the stove and burned in place of normal logs. Hopefully the pellets could burn cleanly and steadily for a decent length of time.
Another advantage of pellets is their convenience. It would be easier to keep a couple of bags of pellets in the house than to have a big pile of firewood outside. Furthermore, even the nearby supermarkets stock pellets these days, so it would be easy to re-stock when needed. With no physical modifications to the stove, it would also be easy to go back to burning logs or timber offcuts whenever I wanted.
In this post I will describe how I built a cheap and easy shower for my tiny house using corrugated galvanised steel sheets.
The shower cost around 200 Euros which included the base, sheet sides, waste plumbing, fixings, sealant, shower curtain and shower head.
I can’t claim any originality regarding this use of corrugated galvanised steel. If you look on Pinterest you can find plenty of examples.
But what is the point? Why use agricultural roofing sheets for the walls of a shower?
Firstly, I like the way it looks. The rustic/industrial aspect fits in well with the sanded pine boards on the walls. I also like the idea of using materials in an unusual way.
Secondly, it avoids the need for tiling. I have done quite a lot of wall and floor tiling over the years and I was keen to avoid it in the tiny house! It’s not that I hate the process of tiling but I wanted something different. Furthermore, the lime and hemp walls were never intended to be completely flat and would not be the ideal surface to tile on. These undulations could be easily accommodated by using the sheet material.
Thirdly, I expected that the shower could be built quite quickly in this way.
Lastly, this system fits in with the low budget ethos of the tiny house. The sheets only cost 11 Euros each (I used 3 of them). Admittedly, the box of fixings cost another 30 Euros, but even so, that’s still very little.
Tiny house shower using corrugated galvanised steel sheets
Design Considerations
My thoughts regarding the design of the shower are listed below.
Shower Base
I considered various options for the shower base such as a large plastic bucket, a wooden barrel, cast concrete, a plastic shower tray from a caravan and even tadelakt (a traditional type of Moroccan polished plaster).
One by one, each of the above options were rejected. The bucket looked awful and the wooden barrel was too small (as was the caravan shower tray). The cast concrete and tadelakt options would have been a lot of work with a high chance of them going wrong.
In the end I chose a ‘normal’ ceramic shower base which measured 70cm x 70cm. This was just big enough to be comfortable in use but small enough to fit into the tiny shower room. It was also cheap (about 50 Euros) and I knew that it would work.
Leaks
Needless to say, I didn’t want the shower enclosure to leak.
The ceramic shower base had a good sized upturn at the edges so I thought that, in combination with a shower curtain, it would work ok.
As for the steel sheets themselves, I didn’t want to make any more holes in them than necessary. For this reason and for the sake of simplicity I decided not to use a normal thermostatic mixer valve and handset. This would have meant cutting large holes halfway down the shower and the curved nature of the panels would have made the installation difficult.
Another potential source of leaks could be where the steel panels joined together. I decided this could be minimised with a large overlap and the use of some clear silicone sealant.
I also thought that a bead of silicone should be enough to seal the join between the steel sheets and the shower base. A timber capping strip at the top would prevent any splashed water from running down behind the sheets.
Finally, I knew that if the shower room walls did become a little wet, it wasn’t the end of the world. The lime and hemp would soak it up and then release it back into the atmosphere later.
Plumbing
As I would be using a conventional shower tray, the waste plumbing would be standard and should be straightforward.
As for the hot water plumbing, I had already rejected the idea of a normal thermostatic mixer and handset so I needed to find another solution.
My preferred idea was to locate the thermostatic mixer valve outside the shower room so that the hot water to the shower already arrived at the perfect temperature. In this way, I would only need one pipe going to the shower. Flow could be controlled by a simple manual valve, just outside the shower. The hot water pipe could be run around the edge of the shower sides and terminate in a shower head at the top. This seemed to be a good compromise between simplicity and convenience. You can read a bit more about the hot water system here.
Obviously, there are numerous even simpler options such as the Hozelock porta shower, a portable electric shower (supplied from a bucket of warm water) or even just a basin and washcloth.
Installation
Installing the base
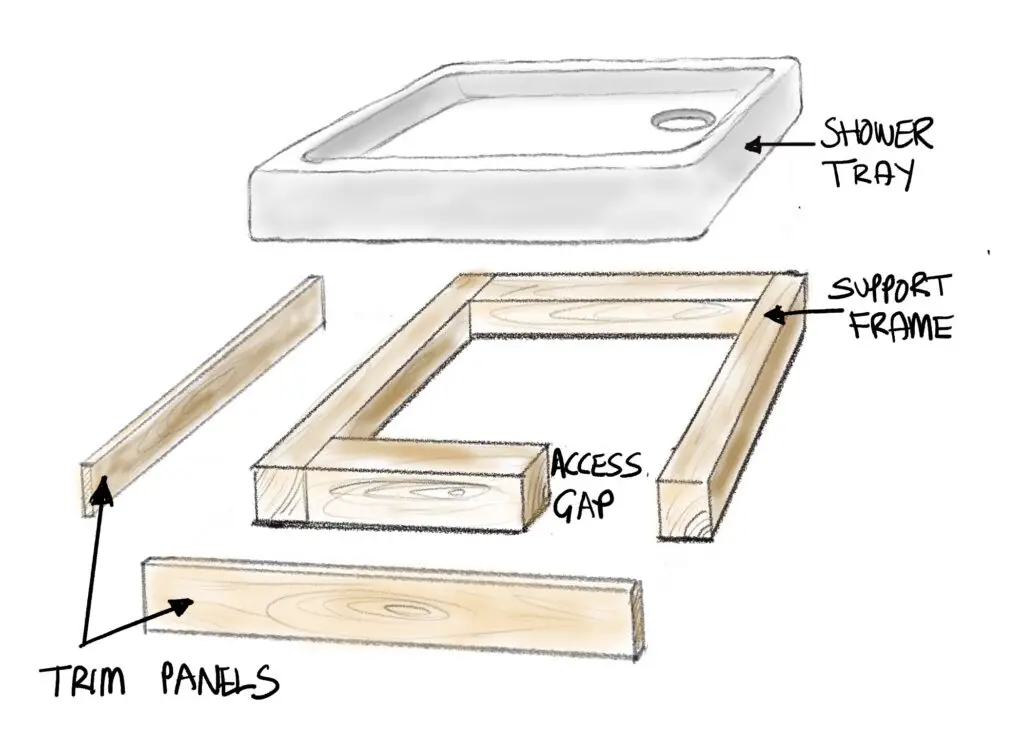
The drawing below should help illustrate my method of installing the shower base.
Shower base
The first thing I did was make a rough timber support frame for the shower tray. This should be quite chunky and tall enough to allow for the shower waste plumbing. Note that I left a gap at the front. This was allow me to check for potential leaks from the waste water pipe and fittings. It might also be handy in the event of future leaks, although access is very tight.
I screwed the frame down onto the timber floor. Given that neither the floor, nor the ceramic shower tray are likely to be completely flat, it is possible that the tray will ‘rock’ slightly on the support frame. The upper surface of the tray may also not be level. You could try to adjust the frame by inserting wedges or packers underneath, before screwing it down. I was lucky this time and found that tray actually sat quite nicely. I bedded the tray down on a decent bead of silicone and ran another bead of silicone around the tray where it met the wall. When the silicone set, the tray was ‘wobble free’.
Next I poured some water down the shower drain hole and looked through the ‘access gap’ to make sure there were no leaks. Again, my luck seemed to be in as the floor under the shower stayed dry. To be honest, my plumbing skills are limited and I found that connecting the waste plumbing and fitting the base to be quite a fiddle.
The final part of installing the base was to screw on some trim panels to the front and side. These were nothing fancy – just some timber offcuts cut to size. The thickness of these trim panels will determine the outside dimensions of the support frame. Ideally the panels will be flush with, or just stepped slightly back from, the shower tray.
Fitting the shower curtain
I was keen to get the shower curtain height just right. Ideally it would extend far enough into the shower tray to minimise the amount of water getting splashed onto the timber floor.
The choice of available curtain rails was poor (they are obviously not a very fashionable item these days) and I ended up with a cheap and cheerless item from a large DIY shop. Although the aluminium and plastic used in its construction was very flimsy, I made sure to install it as carefully as possible and it has actually been ok in use. As the ends of the rail need to be fixed to a flat surface I chose to install it before fitting the corrugated steel sheets.
Adding the steel sheets
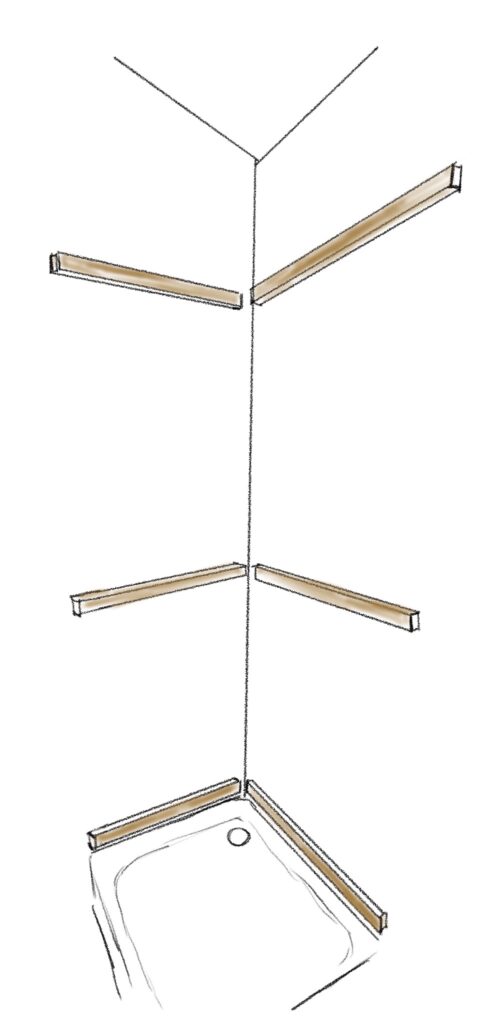
The first task was to screw three rows of wooden battens to the wall to provide a fixing for the steel sheets (see below).
Battens for the steel sheets
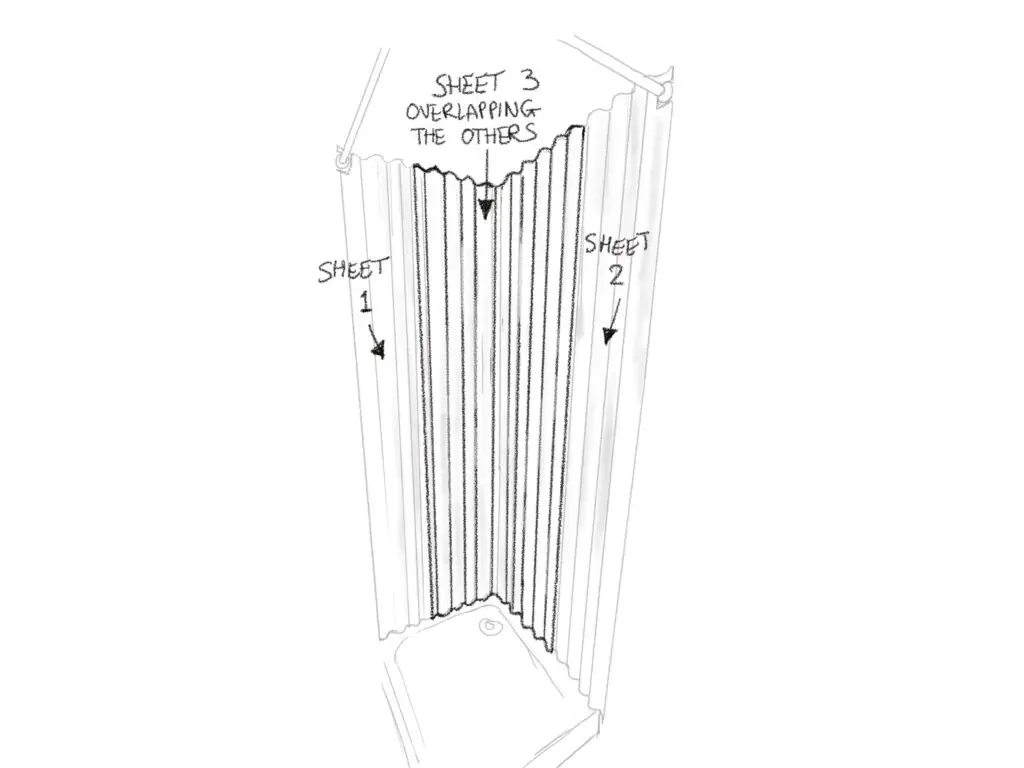
Next, two of the steel sheets were trimmed from 90cm down to 70cm and were stood in place on top of the shower tray. The cut edges were placed at the inside corner. The sheets were also cut to fit around the shower curtain rail.
2 sheets placed in position
The third steel sheet was bent in the middle along its length and fitted over the first two sheets, overlapping by around 40cm each side.
Adding the third sheet
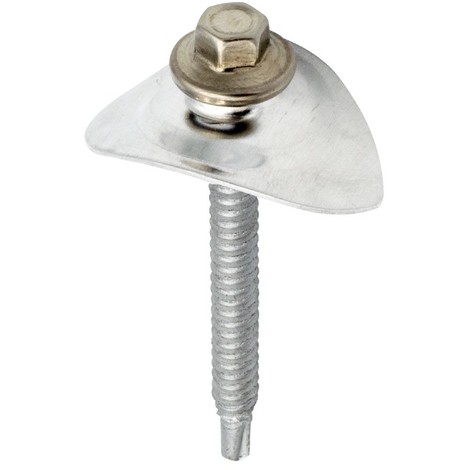
The steel sheets were then drilled and screwed to the battens using the special fixings shown below.
Corrugated steel fixing
Although its not very clear from the above image, there was in fact a rubber seal between the large shaped washer and the screw head, so I’m quite confident that little (if any) water could penetrate the hole and get behind the steel panel.
The fixings were quite easy to use. After drilling a pilot hole, a small socket on the end of my cordless drill was used to drive the screw home. Some care had to be taken not to screw too far, as the sheets could be deformed. This was more likely to happen where the sheets had not been ‘doubled up’.
If you couldn’t get the special fixings (or wanted to save some money), I suppose you could get away with normal screws with a rubber washer and/or a blob of silicone behind the screw head. It wouldn’t be quite as neat though.
The final job was to add a timber capping strip along the top of the shower and seal all the joints with clear silicone.
Fitting the corrugated sheets, from start to finish, took one afternoon and was not particularly difficult.
Use
An unexpected and slightly negative effect of using the steel sheets is that I could actually feel their ‘coldness’ when standing in the shower.
In practice, with a good flow of hot water from the shower, this slight discomfort soon disappears!
Other than that, I think the galvanised steel shower looks good and works well. As a bonus, it is easy to clean and I don’t have to worry about mouldy grout lines.
I know that the galvanised steel will rust eventually. However, according to this website, the zinc layer could last 10 years, even in wet or soaked environments. If that is the case, I’d consider that my 33 Euros have been well spent!
Update: Sept 2023
Two years on from building the shower and I can report that all is good.
The sheets have not started to rust, it doesn’t seem to be leaking anywhere and nothing has fallen off or broken.
Admittedly the shower is only used for (at most) 2 months of the year. Nevertheless, I think this type of shower was one of my better ideas 😉
In this blog post, I will describe what changes I made to my DIY wood powered water heater and show how it performed in testing.
In a previous blog post I described the build and test of the water heater. I have since christened it the “wonky water heater” as it’s a bit squinty and done ‘by eye’. Near enough is good enough, as I often say to myself. Anyway, the heater was made from 2 old butane gas cylinders. The bottom cylinder became a firebox and the top cylinder became a 20 litre ‘thermal store’ (i.e. hot water tank) into which was placed a copper coil. Cold water going into the coil absorbs heat from the thermal store and – hey presto – hot water comes out of the coil. The aim was to give enough water for a few hot showers in my tiny house by simply burning scraps of wood or scavenged sticks.
Firebox
Firebox door in closed position
The first thing I did was to fit a door. The aim of this was to reduce heat loss and – hopefully – transfer more to the water.
The door itself was made from the previously cut out rectangle and the hinges were very inexpensive mild steel items. I fabricated a latch to hold it shut, the handle of which was cut from a wooden broom. At the bottom of the door I cut a slot which I hoped would allow enough air in for good combustion. This actually worked very well. With the door closed the air rushes in and up through the burning wood. You can really hear it roar!
Firebox open showing insulation
The second thing I did was to coat the inside of the firebox with a layer of fire cement mixed with perlite. I used just under 3 x 2kg tubs of cement (from Screwfix) and most of a small bag of perlite (from a garden centre). The ratio was about 1 part cement to 2.5 parts perlite, with a splash of water added. The resulting mix was sticky enough to adhere to the walls of the firebox. I used a plasterer’s mini finishing trowel to apply it.
I hoped that this layer of insulation would reduce heat loss and wear on the steel body itself (in the same way firebricks do in a wood burning stove).
In practice, the outside of the firebox still gets very hot so I don’t know how much energy is saved. The cement/perlite layer became very tough when fired, so I’m sure it at least offers good protection for the steel.
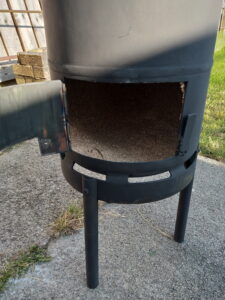
I also welded on some rectangular feet to the bottom of the legs (see image at the top of the page). These make the heater more stable and allow it to be bolted down, if required.
Thermal Store
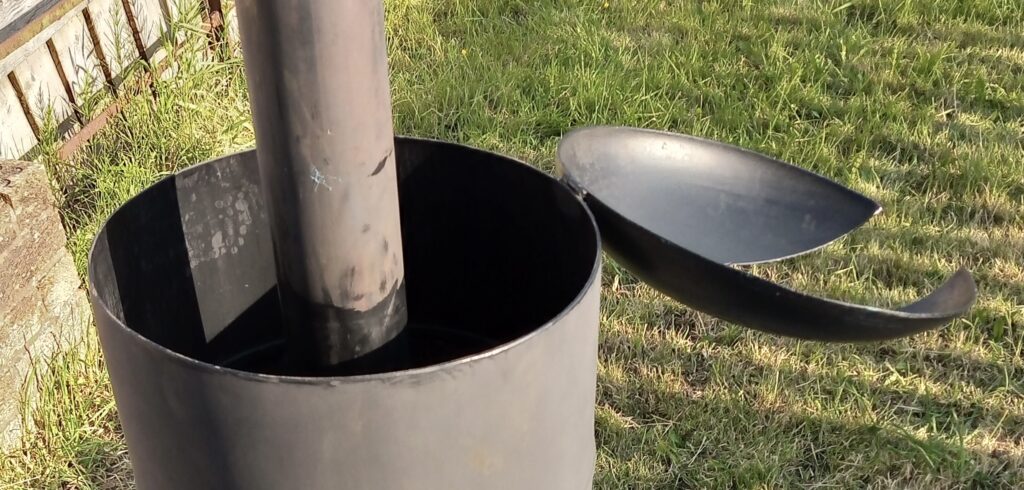
The thermal store got some attention too. The first improvement was the addition of a hinged lid with a slot cut out for the flue and copper pipe. I later added a wooden handle to make it easier to open and close the lid when hot.
Water heater hinged lid
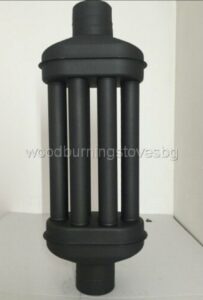
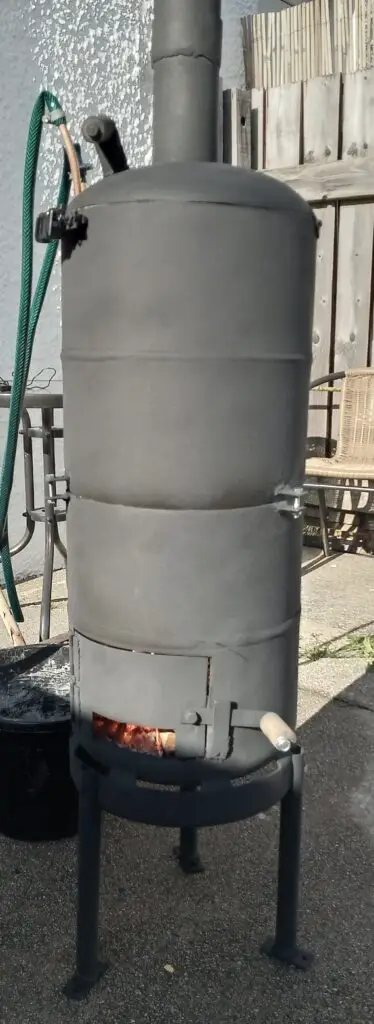
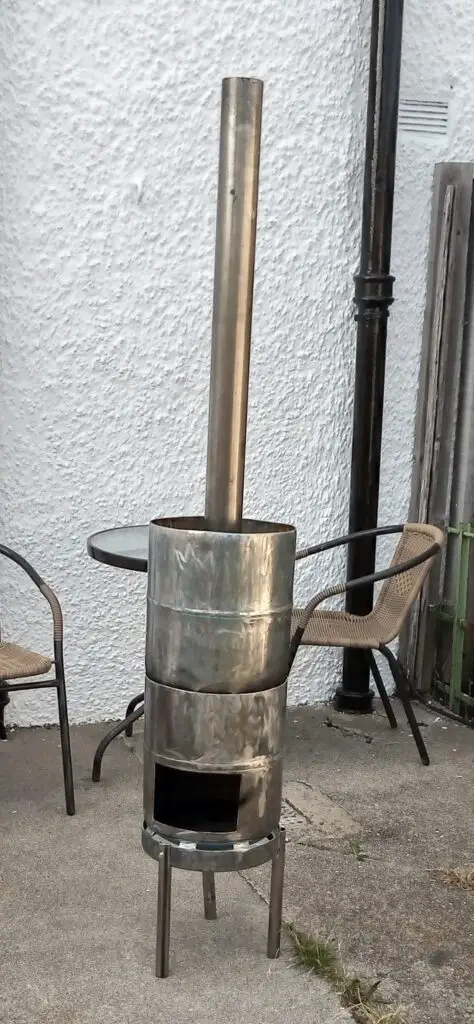
The finished water heater
The second job was to make the flue demountable. To do this I cut a small section (about 40mm) off the top. I then cut a slot in the small piece so it could be expanded slightly to fit over the stub of the flue. Next it was welded onto the stub to form a collar into which the top part fitted.
The third task was to install the thermometer. The bracket was simple enough – just a small piece of steel flat bar attached to the top of the thermal store with two bolts. The bolts space the thermometer away from the worst of the heat (it’s made from plastic). Cable ties were used to attach the thermometer to the flat bar. A hole drilled in the thermal store allowed the temperature sensor and wire to pass through. The sensor itself dangles in the water about 1/2 way down.
Lastly, the heater was given 2 coats of high temperature black paint from a spray can. This didn’t cover the blue paint of the lid very well (which I had already given a coat of engine enamel) but worked fine on the bare metal.
Performance test
I wanted to find out if the modifications would get the heater up to temperature more quickly and give greater hot water output.
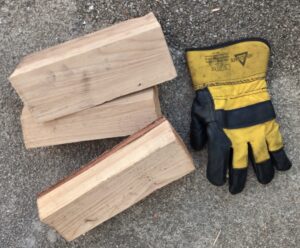
Birch logs used for test
I also tried some ‘proper’ hardwood logs (Birch) rather than pallet wood.
The photo gives an idea of the firewood size. In practice I could only fit one of these at a time (at least until the previous wood had burned down).
Over the course of the test I used 2 full ‘blocks’ and some kindling.
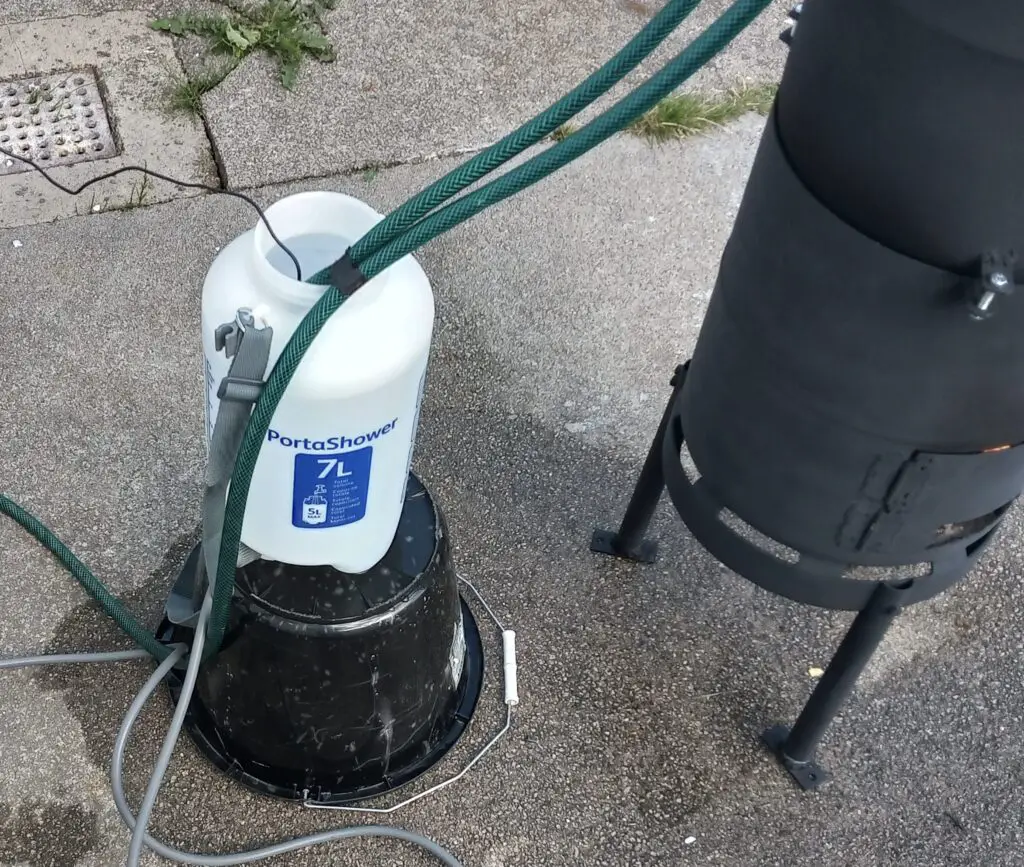
The other change to the test setup was to draw off hot water in 5 litre amounts. I did this by filling up my Hozelock porta shower. In this way I hoped to learn how many showers the heater could produce for a certain quantity of firewood. A ‘shower’ was defined as 5 litres of water at 40 deg C or above.
Heater used to fill Hozelock portashower
The video below shows the water heater being put through it’s paces.
Test Results
The firebox was loaded with some kindling and 1 block of Birchwood and it lit very easily. The temperature rise in the thermal store is shown below.
Burn time
Water temp
Notes
0 minutes
18 deg C
10 minutes
45 deg C
20 minutes
69 deg C
2nd log added after 25 minutes
30 minutes
90 deg C
33 minutes
95 deg C
The temperature of the water in each 5 litre fill of the Portashower is shown below.
Shower Number
Shower Water Temperature
Thermal Store Temperature
1
74 deg C
95 deg C
2
61 deg C
Not measured
3
55 deg C
Not measured
4
48 deg C
Not measured
5
44 deg C
61 deg C
6
41 deg C
56 deg C
Hozelock Portashower test
Around 10 mins after shower 6, the temperature in the thermal store had risen again to 65 deg C. By this time the firewood was glowing but there were no flames. It was enough to produce a 7th shower at 42 deg C.
During the course of the test, the outside of the firebox got very hot, so this is still an obvious source of heat loss. In future, I may try to cast an external layer of perlite/fire cement insulation around both the firebox and the thermal store.
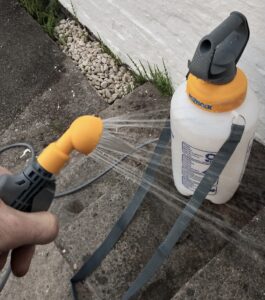
I also pressurised the Hozelock Portashower and measured the shower time. With a full 5 litres, the shower lasted 3 minutes and 30 seconds (including occasional stops to pump It up a little).
Conclusion
The water heater got up to temperature more quickly and produced more hot water than during the previous test.
Clearly the temperature of first few showers was far too high. In practice, cold water would have be added to get a normal shower temperature of 40 – 45 deg C.
It’s reasonable to say that the heater would give 8-10 showers at 40-45 deg C from just over 2 blocks of wood.
In practice, one filling of the firebox should be enough to see the thermal store get to 70-80 deg C and provide 3 showers. This is fine for the tiny house, which will probably only be occupied by 1 or 2 people at a time.
Obviously in the winter the initial water temperature will be lower and more firewood would be necessary to get the same hot water output.
In spring and autumn I hope to use a solar heater to pre-heat the water. In which case the heater may use less firewood for the same result.
In summer it’s likely that the solar heater will provide almost all the hot water and the wood powered water heater will be hardly required.
The total cost of the project was around £150. This went on steel tube, steel flat bar, paint, welding wire, screws, nuts and washers, fire cement and perlite, hinges, a copper coil, 2 thermometers, grinder discs and a drill bit.
It should be possible to run the water heater on scavenged ‘windfall’ sticks and branches and waste wood from the tiny house build. So it does live up the promise of “free hot showers” (after the initial build cost). However, it’s likely that I will be buying some hardwood for the tiny house wood stove anyway and some of this will find it’s way into the water heater in winter.
It’s done! Today I tested my wood powered water heater and I’m glad to say that it works. In this post I’ll outline the build, the results of the performance test and what improvements could be made.
If you haven’t read Part 1, the aim of this project is to make a water heater that is connected to the tiny house plumbing system but is actually located outside the house.
This has the benefits of not overheating the house in summer and not requiring an (expensive) double wall flue installation. Furthermore, having it outside will safe space and the heater can be ‘quick and dirty’ (e.g. no need for a fancy sealing door).
It has recently occurred to me that this heater could also be useful for ‘topping up’ hot water produced by solar energy. This would be handy in the winter or on cloudy days.
2 gas cylinders and a flue pipe
The Build
The water heater was made from 2 gas bottles which originally contained 13kg of butane.
After emptying the bottles of gas and purging them with water, the top was cut from both cylinders and the metal support ring was also removed from one of the cylinders.
One of the cylinders became the ‘firebox’ (bottom), the other became the ‘thermal store’ (top).
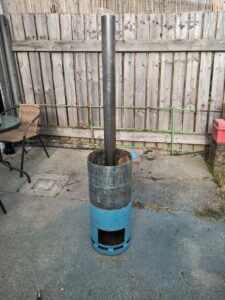
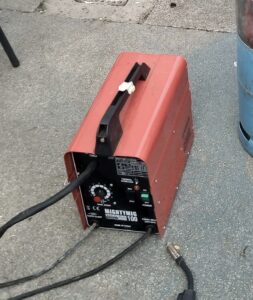
Terrible welding – but it did work eventually
The thermal store had a hole cut in the bottom and a piece of 75mm tube welded in place. I had barely used my welder before this, so my welding was terrible. It took a lot of grinding, testing and re-welding before the join was watertight.
Sealey Mighty MIG
By the way, the welder I used was a Sealey Mighty MIG 100. This uses flux cored welding wire (no gas required). It’s quite basic but seems to be fairly decent quality for a budget machine.
The rectangular hole in the firebox was cut big enough so that it could be filled with fairly large pieces of wood.
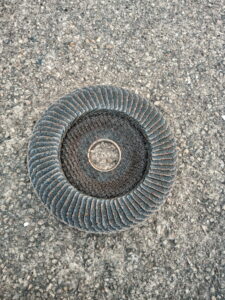
Bosch abrasive wheel for grinder
Removing the original blue paint was achieved using a Bosch abrasive wheel fitted to an angle grinder. This took a little time but the wheel was very effective and lasted for the whole job (still going strong).
Bolt-on legs
Three bolt-on legs were fitted to the firebox and some brackets welded onto each half of the heater so they could be bolted together. This was a safety issue as I didn’t want the thermal store (scalding water) to be able to be easily detached from the base. Prior to this, the thermal store was just sitting in place.
The final step was to put a heat exchanger coil inside the thermal store. This was made from a 10m length of soft copper ‘micro bore’ pipe with a diameter of 10mm. I thought this might be too small but I gave it a try anyway.
Test Procedure
I added 20L of cold water to the the thermal store and connected one end of the heat exchanger to the mains via a garden hose. The other end of the heat exchanger discharged into a bucket via a short length of hose.
Digital thermometers were put inside the thermal store and the discharge bucket.
The firebox was filled with scrap wood from a pallet and the fire lit.
Performance Results
The video below shows the water heater being tested.
The initial temperature of the water in the thermal store was 17 deg C.
After 15 minutes of heating the temperature was raised to 47.5 deg C.
After 35 minutes, the temperature in the thermal store was 70.9 deg C.
Test 1
At this stage I drew off 2 buckets of hot water (10L per bucket). The first bucket had a water temperature of 37 deg C and the second was 34.8 deg C, giving an average of just under 36 deg C. The temperature in the thermal store had dropped to 51.6 deg C.
Next, I added more wood to try to get the water in the thermal store as hot as possible.
Test 2
After a further 20 minutes of heating, the water in the thermal store was 87.8 deg C.
I drew off 3 buckets of hot water. Their temperatures were 51.4, 42 and 36 deg C. So the heater had given 30L of water at an average temperature of 43.1 deg C.
The water in the thermal store had decreased to 60.4 deg C.
By this time the flames had died down and firebox consisted mainly of embers.
Test 3
As a final test I waited for 10 mins, without adding further firewood and drew another 3 buckets of hot water from the heater.
The average temperature of this final 30L of water was 31 deg C.
Regarding wood consumption, after the initial fill, I topped the firebox up once. That equates to, perhaps, 3 planks from a pallet and one or two chunkier blocks.
The heater burned quite cleanly i.e. there was not a great amount of smoke visible from the top of the flue.
During the course of the tests, the water level in the thermal store dropped by 1-2 cm, presumably from evaporation.
Conclusions
I was more than happy with the results of this test.
Firstly, the water heated up remarkably quickly. With a full fire the temperature increased by about 10 deg C every 5 minutes.
The heater performed best when the water in the thermal store was very hot (almost 90 deg C). This temperature could be easily reached in 45 minutes from cold.
With a thermal store temperature of around 90 deg C, the heater could provide 30L of water at an ideal bathing temperature (40 – 45 deg C). If used to fill my Hozelock portashower, this would be enough for 6 showers (plenty for my 3 person tiny house).
I see no reason why it would not be an effective way of topping up the temperature of solar heated water on cloudy days.
The small capacity heat exchanger coil worked surprisingly well at removing heat from the thermal store. I had considered doubling it’s length or replacing it with a larger diameter coil but I’ve decided to leave it as it is.
Improvements
Heat is almost certainly being lost through the open hole in the firebox. Adding a door may help reduce these losses. Of even greater benefit would be insulating the firebox. It should be possible to do this by adding an insulation blanket (such as ceramic fibre) to the inside walls and base. It these two improvements are made, then more heat would be transferred to the water above, increasing the performance and/or reducing the wood consumption.
External insulation of the thermal store might also improve performance. At the very least the water would stay hotter for longer after it had been heated. I will try to cast a thin layer of hempcrete around the thermal store for this purpose. It will cost me nothing to try it (I have plenty left over from the tiny house build).
Another possible improvement is the fabrication of a lid to cover most of the top of the thermal store. This might reduce heat loss as well as water loss from evaporation. My idea is to make it hinged so that it could be swung back out the way for easy filling of the thermal store by bucket.
Besides the above, I will give the heater a coat of black high temperature paint and cut the flue into 2 sections that can be re-assembled. This will enable easier transport of the heater by car.
In this post I will describe how I built a simple outside compost toilet that was used during the construction phase of the tiny house project.
I chose a compost toilet for simplicity, to save water and because my tiny house is not connected to any sewage network. You can read more about the ultra simple ‘biolitter’ toilet here.
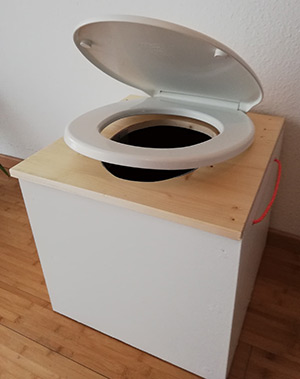
The image to the left shows my compost toilet setup. Building it was the first job I had to do!
As you can see, it consists of a box made from OSB. The top face of the box is removable and a large galvanised steel bucket is placed inside. I had to fix more OSB inside the box to raise height of the bucket to just under the top face. The last job was to cut a hole in the top and screw on a toilet seat.
Next to the toilet was placed a plastic bucket containing the compost ‘litter’. This has a lid to keep the litter dry and keep out creepy crawlies.
In order to keep the toilet stable on the uneven ground, I placed it on another piece of OSB.
Toilet Enclosure
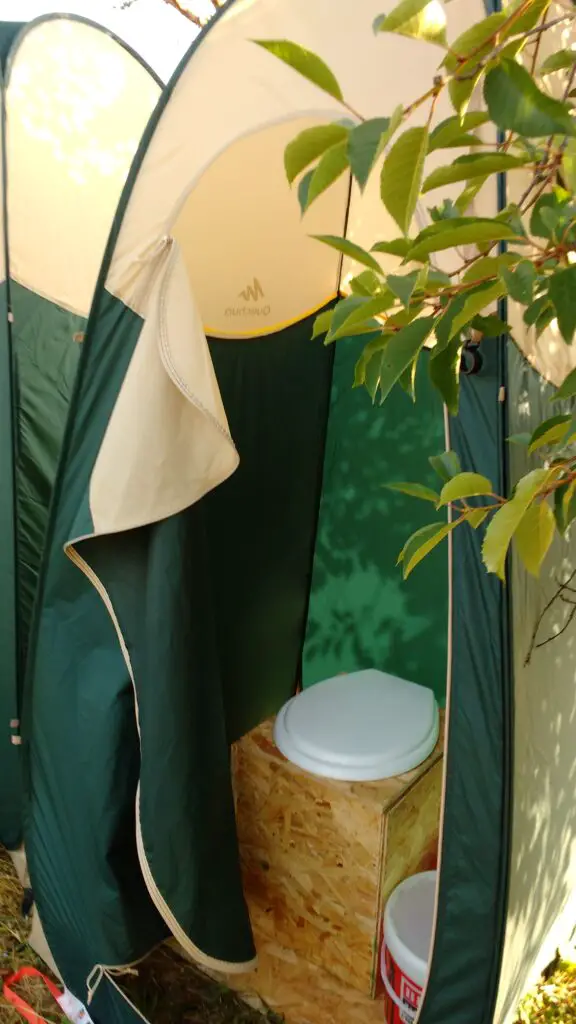
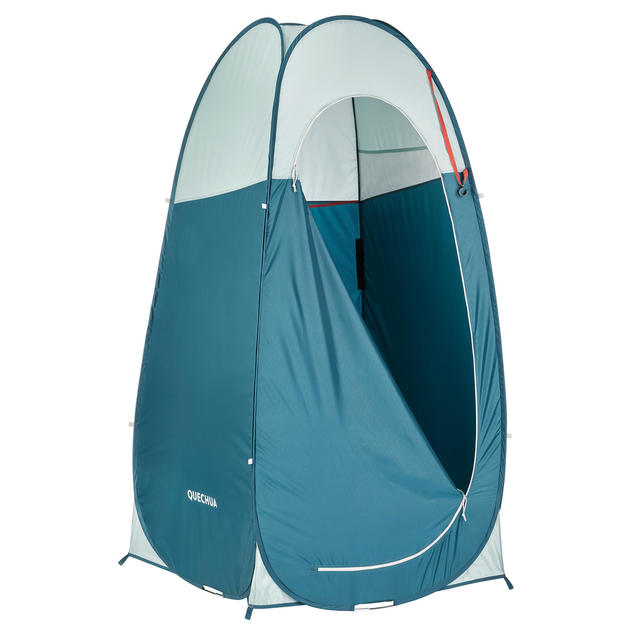
The toilet was placed in a pop-up shower cubicle with a zip-up door.
Pop up shower cubicle for compost toilet
I got mine from Decathlon ( a French outdoor products retailer).
The cubicle is quite handy in that it goes up very quickly and packs down into a small space. There is also a mesh pocket inside for putting shampoo, hand sanitizer etc.
I actually bought two cubicles and used the other one for the solar shower.
Each cubicle cost £49.99 which is ok. I considered building a toilet and shower enclosure from wood, but that would have cost more, taken longer and would eventually need to be dismantled and disposed of. The cubicles have been great in that they can be quickly installed and removed each time I visit the tiny house.
As the cubicle is open at the top, I used un umbrella to cover up the hole when the weather was bad. You could just as easily tie on some plastic sheet or material from an old tent.
Compost toilet litter
For the compost toilet litter, I initially bought a bale of wood shavings from a local agricultural co-op (these are very handy shops in rural France and you can buy all sorts of items: hardware, work clothing, garden items and even local food and drink).
Anyway, the wood shavings are said to be better than sawdust as there are more airspaces and so the compost is better aerated.
After each visit to the toilet we added a handful of litter and the bucket was emptied every day or two. After emptying I gave the bucket a good rinse with the garden hose, added a layer of litter and it was ready to be used again.
The wood shavings worked ok and lasted for most of the first summer (about 6 weeks). Later on I switched to using hemp as I had a large quantity left over from the tiny house build.
It turns out that hemp is well suited for use in compost toilets. I didn’t know it at the time, but hemp is also sold for use as animal bedding. One supplier claims that is is more absorbent than wood shavings or straw and is also good at reducing odours. I also learned recently that a Dutch company make public urinals that use hemp, the end result being an organic fertilizer. Apparently hemp composts quite easily.
So, hemp seems like the ideal stuff for my compost toilet and luckily I have loads of it lying around. So that’s what I will be using for quite a while!
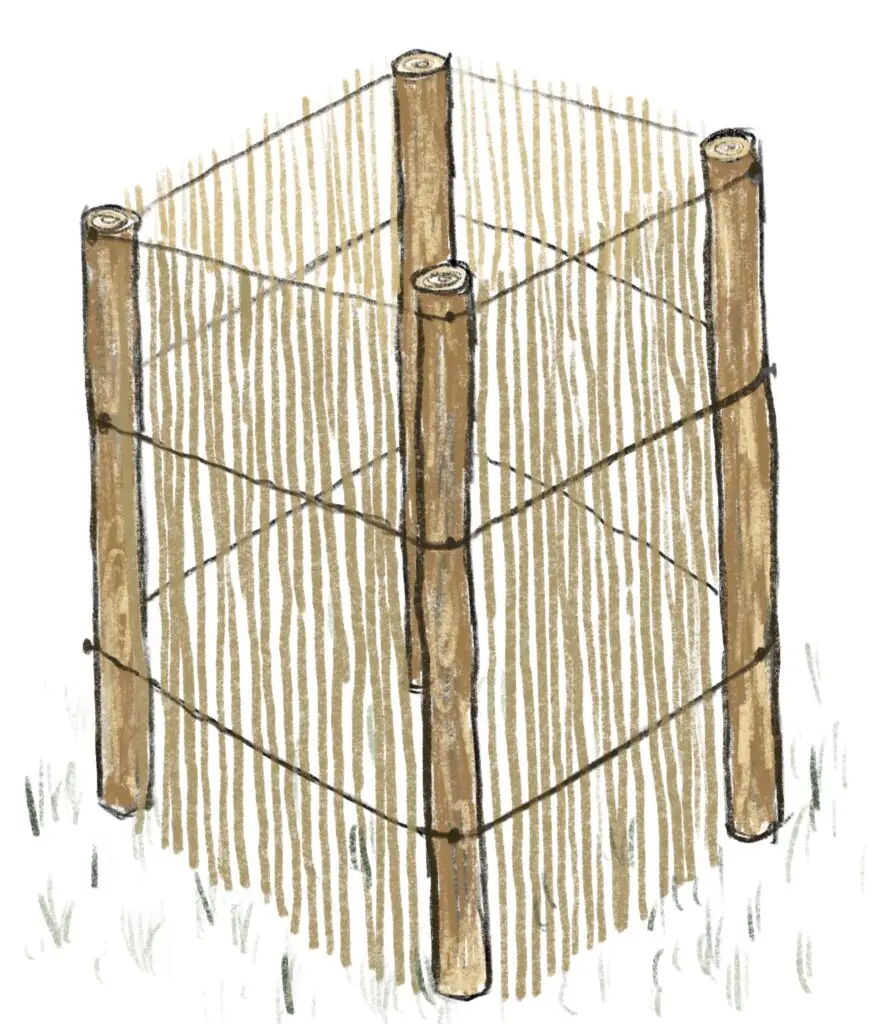
The Compost Heap
My first compost heap was very quick, cheap and simple. I made it from reed garden screening that I screwed to 4 wooden posts hammered into the ground.
Quick and simple compost heap
The base was about 0.8m square and the height about about 1.2m.
Besides the toilet waste, I also used added food scraps, waste paper and some cardboard.
Each time I added toilet waste onto the heap, I also added a bucket of dry hemp on top.
By the end of the summer, the heap was nearly full.
Some months later I noticed that the pile of compost had shrunk a little and when I turned the top layers over, there was steam coming from the middle. So its seems that the decomposition process was working.
Bad Smells?
Yes and no.
As the toilet cubicle was open at the top and the toilet itself had a lid, it wasn’t smelly in the toilet itself. At times it was used by me, my 2 children and my 2 step-children and nobody complained!
The compost heap did produce some odours though. Absorbent as the litter is, there always seems to be some urine at the bottom of the bucket. When emptying the bucket onto the compost heap, this liquid is then at the top. Although I did add a layer of dry hemp, there still tended to be a urine odour coming from the heap. It didn’t help that the compost heap was close to the house. Putting more dry hemp on the heap reduced the smell but also filled the heap up quickly.
In future I will locate the compost heap further from the house (but not too close to the neighbours!) and will make it a bit bigger so that I can add more dry hemp.
Next steps – An Inside Toilet
The next stage of the building process is to complete the shower room inside the tiny house. Apart from the shower, it will also have a compost toilet and a wash hand basin.
My plan was to build another compost toilet, albeit a more ‘attractive’ version, something like the one shown below.
Portable Compost Toilet
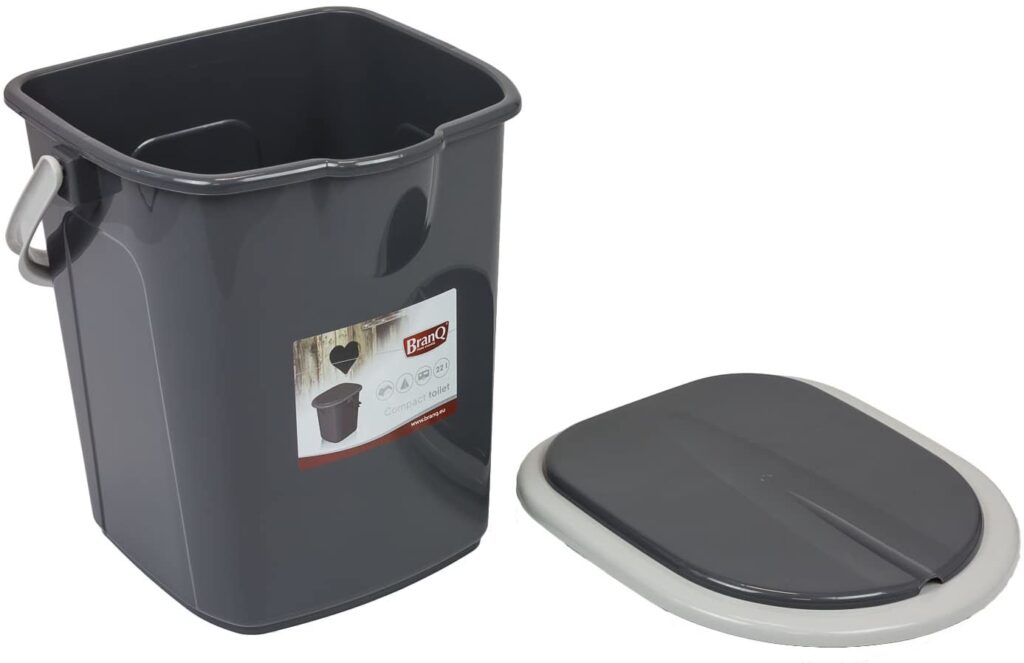
However, I came across a ready made plastic camping toilet which looks worth a try.
At around £30, it’s not much more expensive than the price of a new toilet seat. It has the advantage of being less bulky than a home made ‘square box’. This could be a real bonus as the shower room is very small (little more than a cupboard). The shape looks like it would give more space for the user’s feet while sitting. It’s also a comfortable height (44.5cm). The 22 litre capacity should mean that I don’t have to empty it quite as often too.
BranQ camping toilet
So I went ahead and ordered one and will try it this summer. I also ordered some compostable plastic liners for the toilet. These will help keep the toilet clean and may also reduce odours from the compost heap if it gives the hemp a bit more ‘absorbing time’ before the bag decomposes. The risk is that they don’t actually decompose very well and/or they impede the aerobic process. I guess I’ll find out soon enough!
In a previous post I dismissed the idea of a solar water heater as being too complicated and expensive.
However, it is still an appealing idea. Simple, clean, free, effective and ideally suited to make use of the sunny French climate where the the tiny house is located.
Unlike a ‘normal’ house with a ‘normal’ family, my hot water requirements are minimal. Using a Portashower, I know I only need 5 litres of water per shower. The tiny house can only sleep three people (and mostly it would be just me). So I could probably get by with 20 litres of hot water per day, or even less.
Commercial Solar Water Heater Systems
The typical solar arrangement (shown below) with a roof mounted solar panel feeding a large hot water cylinder would be way over the top for my tiny house.
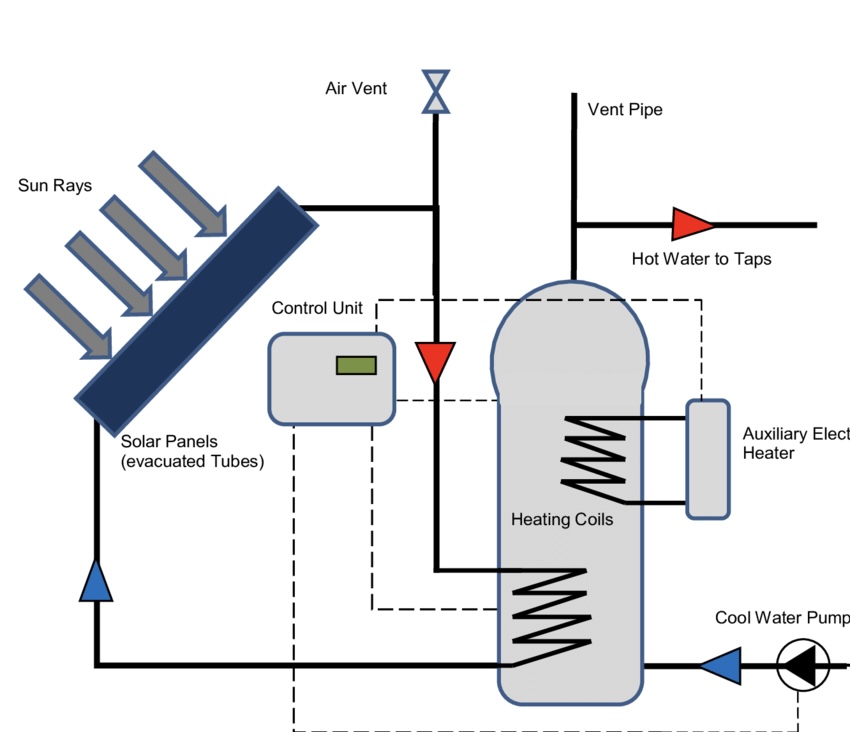
Typical solar water heating system
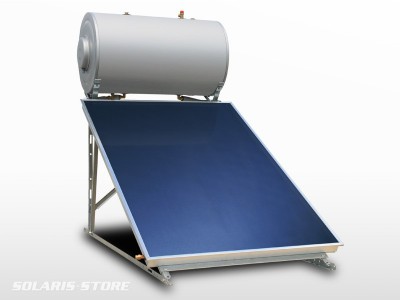
Even a simpler ground mounted solar panel with a thermosiphon header tank is too big and too expensive. For example, this 200 litre system, from the French company Solaris, costs nearly 1300 Euros.
Solaris solar water heater system. Ground mounted and works on thermosiphon principle.
DIY Systems
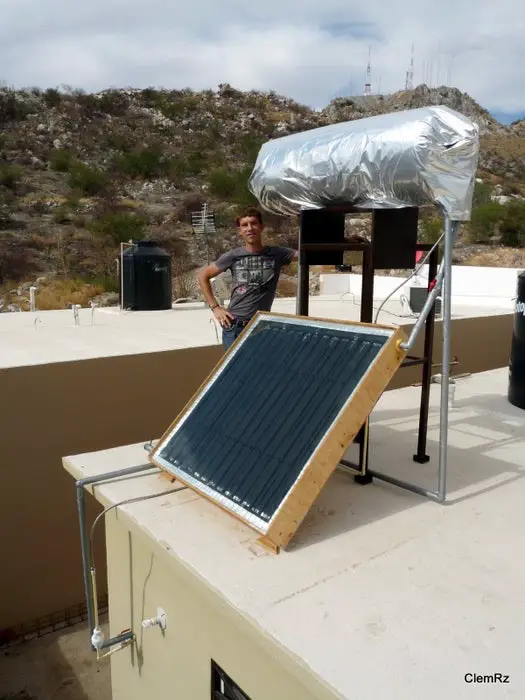
I know that people have been making DIY solar water collectors for years. Typically these consist of copper or plastic pipes in a grid or coil arrangement, painted black and placed in a glazed insulated box. Hot water from these collectors is normally transferred to a tank – either by pump or thermosiphon.
There is plenty of information out there on DIY solar water builds, such as the one shown below from instructables.com.
DIY solar water heating system
Going down the DIY panel route has advantages. I could build something small enough to meet my needs and I wouldn’t have to pay the shipping costs of a bulky commercially available panel. But what about the header tank? I don’t need 200 litres. What are the options?
I considered lots of possibilities but the one that seemed most promising was based on an insulated plastic cool box. I could easily get one with about 20 litres capacity (perfect!) and I could probably fit a tap to drain off the hot water as needed. The problem then is that I’d then have to manually top up the panel with cold water, unless I fitted a float valve plumbed to a cold water feed. So even now things are starting to get a little bit more complicated.
Is there an even simpler way?
Solar batch water heater
My thoughts then turned to the old idea of the solar batch water heater. At their simplest, these are basically a “tank in the sun”. Typically they consist of a recycled water cylinder, painted black, put in a glazed and insulated box and plumbed in-line with the domestic water heater. Thus the cylinder is both the solar collector and the storage vessel. The hot water coming from the cylinder, into the domestic water system, may require some ‘topping up’ with heat to get it up to temperature, but useful energy savings can still be made.
OK, so the batch water heaters are cheap and simple, but I dont want a giant cylinder in my garden with much more water than I need.
But what if I could make a normal solar collector with a large enough water capacity that it effectively became a batch heater? I.e. no need for a separate tank.
Remember, I only need 5 litres of hot water at any one time.
With this in mind, I came up with the following design:
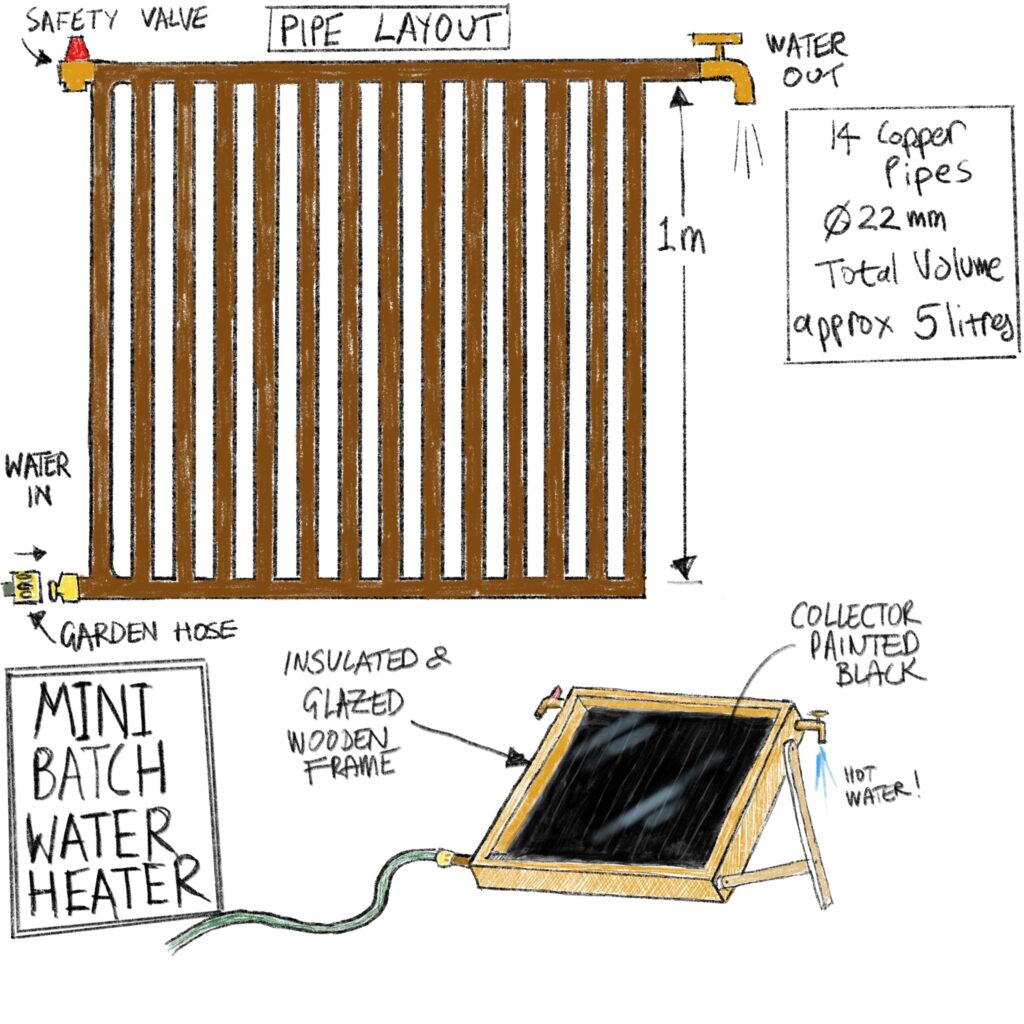
Mini Batch Water Heater
DIY Mini Batch Water Heater Design
There is nothing revolutionary in my design. The important point is that the 22mm copper pipe is large enough to give a total water volume of 5 litres for a panel that is around 1 square metre. It might not heat up as quickly as a normal collector (which has a lower water volume) but that’s not too important. If it can get the water to 45 deg C in 30 mins or so, that will be absolutely fine.
I wont go into too much detail regarding the construction. The 22mm copper pipe would be soldered together using standard elbows and tees. Ideally it would be clipped onto a thin metal sheet of some kind in order to increase the amount of heat absorbed, but I think this is optional. The whole lot is then sprayed matt black.
The retaining frame is made from wood and insulated at the rear to reduce heat loss. I think that anything can be used for the insulator but I suspect a sheet of foam would be cheap, effective and easy to get hold of.
As for the glazing, I wouldn’t be too keen on using real glass. Besides the weight and fragility, it would also have to be custom cut. I would go for clear, corrugated polycarbonate. To avoid it fogging on the inside, I would seal the ends with tape. A bead of clear silicone would fix it into the frame.
A pressure reducing valve (PRV) might be an idea if there was any chance that high temperatures would cause water expansion and pressure on the solder joints. I guess this wouldn’t be needed if the heater was attached to a garden hose as this could expand slightly. Of course, if the garden hose was disconnected all the water would drain out! So maybe a non return valve would be a good idea, in which case the PRV might be needed after all.
Some wooden legs either side of the frame would allow the panel to face the sun at, say, 45 degrees. If I was being really clever I could make a cradle so that the panel could be rotated to any angle.
If I wanted to store a greater quantity of hot water then I could fill up an insulated container 3 or 4 times during the afternoon, giving me some for the evening.
Should the panel prove to be effective, it might actually be worth connecting it to the water system of the tiny house. It could conceivably be fixed onto one of the exterior walls of the house and hinged so it would swing outwards to collect the sun.
To conclude – solar is back! If I make it to France this summer (2021) and I finish all the other jobs I have to do, then I will have a go at making the mini batch water heater. Stay tuned to see if it works…
Something which had taxed my brain for a while was the tiny house hot water system.
I considered lots of options. As ever, I wanted something simple, cheap and environmentally sound.
A back boiler on a wood burner could have been used to heat a hot water tank by a simple thermosiphon arrangement. Unfortunately, there’s not much room inside the tiny house for a hot water tank. Neither would it be practical in the summer, when it’s already 25-30 deg C inside, to have to light a stove in order to take a shower!
Solar water heating systems seemed to be complicated and expensive and, again, I don’t have much room for hot water storage tanks.
I considered a cheap gas powered water heater, the sort that gives hot water on demand. Apart from the gas consumption and it’s lack of eco-credentials, I was wary of it breaking down in a few years and the likely hassle of obtaining spare parts. Not to mention having to install the thing on the wall inside the cabin (no space!) and have a flue vented to outside.
In the end I decided to build a wood fired water heater that could be located outside the cabin but connected to the cabin’s plumbing system.
This would solve the problem of overheating inside the cabin, it wouldn’t require bulky hot water tanks indoors and it should be relatively cheap, simple and efficient. Nor would I need to install a twin wall flue inside the cabin, with all the expense and hassle that would entail.
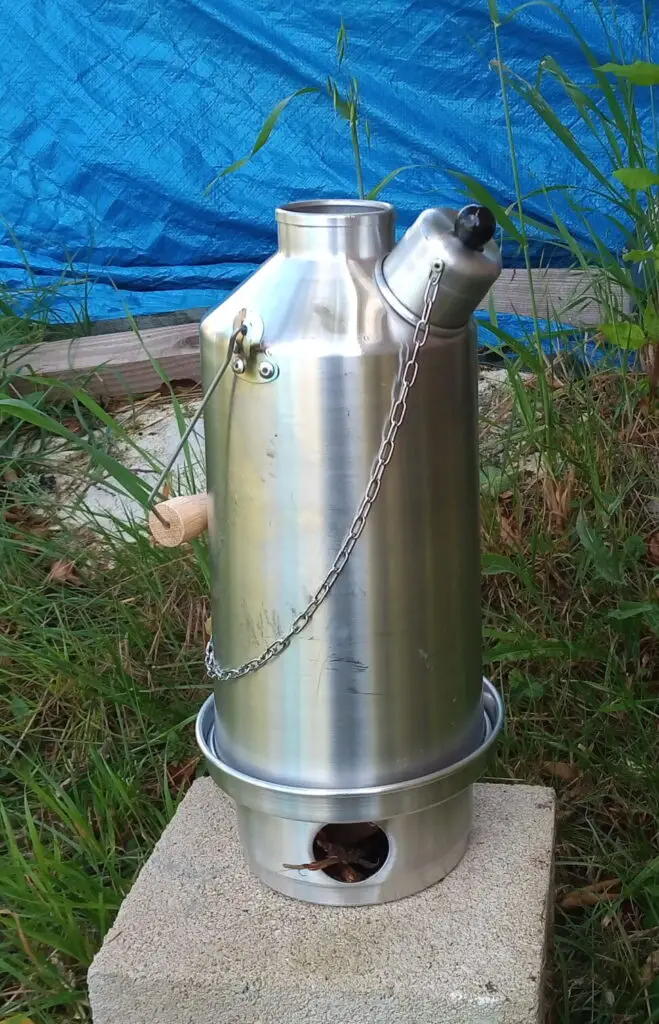
Regarding the design, I got some inspiration from my storm kettle (a.k.a Kelly or Ghillie Kettle). The principle is that water is contained in a jacket surrounding a central chimney heated by a firebox beneath. Presumably it is this large heat transfer surface area which accounts for its effectiveness. In use it can bring 1.5 litres of water to the boil in just a few minutes using a handful of dry sticks.
Storm kettle
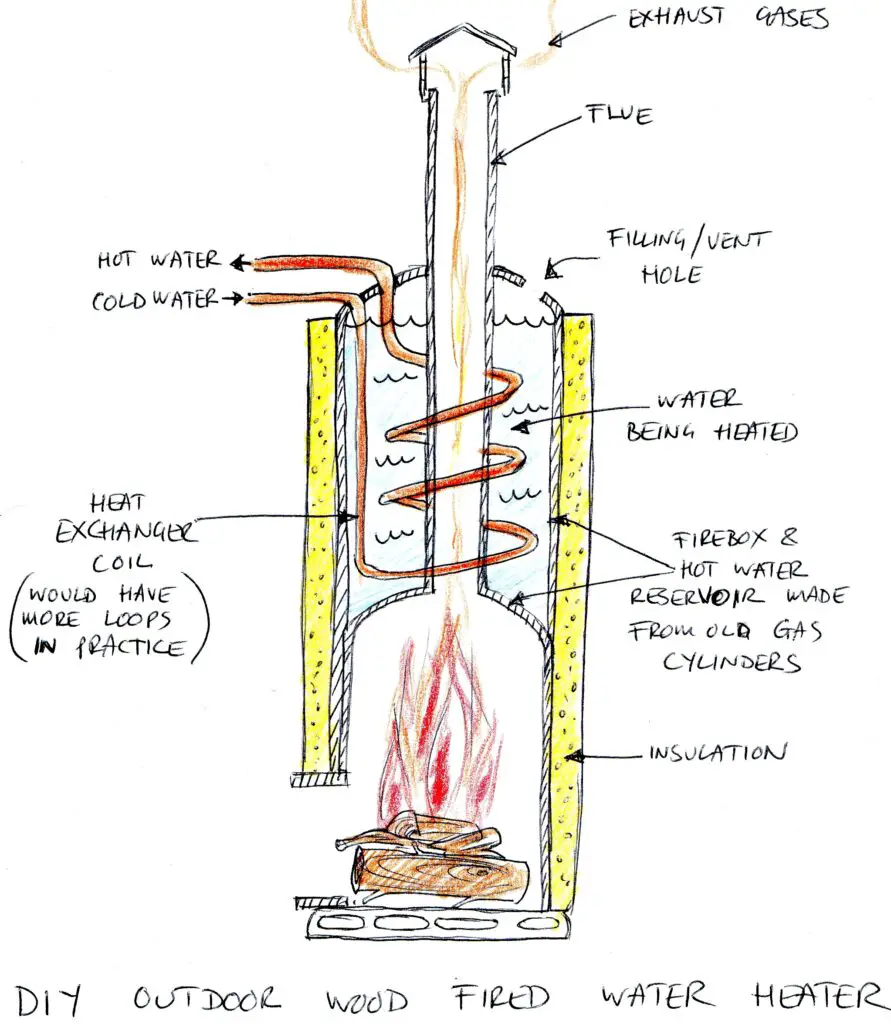
The sketch below shows my design idea of the tiny house hot water heater. It’s based on two salvaged butane gas bottles, one on top of the other. The upper bottle contains the hot water, through which the flue passes. Sitting in the water is a coil of copper pipe that will act as a heat exchanger. The lower bottle is used as the firebox.
Sketch of wood fired water heater
The insulation would serve three purposes. Firstly, it would reduce heat loss from the hot water, keeping it hotter for longer. Secondly, it would reduce heat loss from the sides of the firebox, thereby increasing the amount of heat transferred to the water via the top of the firebox and flue. Thirdly, it would improve safety by reducing the temperature of the external surfaces.
The design could be improved further by adding other elements, such as :
Legs to raise the heater to a more comfortable height.
A thermometer to measure the water temperature.
A pressure relief valve and/or expansion vessel on the copper pipe leaving the heater.
A grate to allow for good airflow under the fuel.
My main concern with this design concerns the heat exchanger. Would it be effective? In other words, would the cold water pick up enough heat on it’s passage through the coil to be of any use?
I did some research and, based on comments in various forums, it didn’t look too promising.
It’s likely that the flow rate of the hot water from the heater would be low. This might be fine for filling up a washbasin or kitchen sink but it’s unlikely to be good enough for a normal shower running from a mixer valve.
So was there any point in continuing with this design? How else could I make a working shower system? ‘
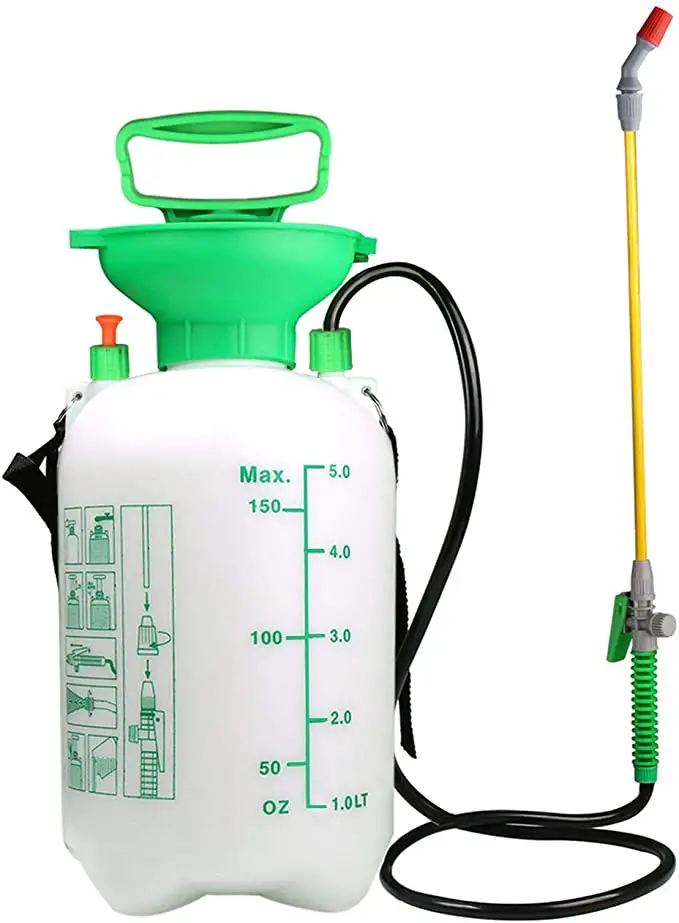
On previous building trips I had used a 5 litre garden sprayer such as the one shown below as an improvised shower. I removed the spray head and cut the tube so that just a little stub was left. This was necessary to improve the flow rate but gave a stream of water rather than a spray.
Typical 5 litre garden sprayer!
The last modification to the sprayer was a coat of matt black paint. After this, it functioned pretty well as a ‘solar shower’. By leaving it in the sun in the afternoon, I could have a hot shower at the end of the dirty and sweaty day of building! If I needed a shower at other times (or if I had guests) I simply put a kettle of hot water in the sprayer, topped it up with cold water and it was perfect.
So, getting back to the point, could I use a similar system for my indoor shower room? If so, I wouldn’t need a great flow rate from the wood burning water heater. I’d just need to be able to fill the sprayer with 5 litres of moderately warm water. It should also be possible to fill the sprayer repeatedly so that guests could have a shower too.
With that decided, I wondered if there was a better sprayer system on the market? One with a proper spray head?
After a bit of searching I found that Hozelock make a “Portashower” which has a 7 litre capacity, a good spray head and is pretty cheap (about £30). The reviews are very positive so I have ordered one and plan to use it this summer (2021).
Hozelock 7 litre Portashower
While searching for the Portashower I also came across lots of electrically powered camping showers. Some of these have rechargeable batteries and others run from a 12v cigarette lighter socket.
As I have a 12v leisure battery in the house, I wondered if one of these systems could also work as a permanent installation in the shower room? In this case I could have hot and cold taps in or near the shower cubicle. These would be used to fill a bucket with warm water which would then be pumped electrically to give a shower. This might be a bit more convenient than the portashower (no pumping and screwing/unscrewing of lid) and the shower could be longer (10 litre bucket).
So, as a plan B, I bought a Ring RS1 portable 12v shower. At around £20, this is even cheaper than the Portashower and also has good reviews. I chose the Ring system as they are a well known brand but if you look on eBay or Amazon there are plenty of similar, inexpensive systems.
Ring RS1 12v portable shower
So now I have the shower problem solved … let’s get back to the wood burning water heater design.
I’m fairly confident that the heater will be able to produce 20 litres of hot water quite quickly. If this turns out to be true then the next question will be the design of the heat exchanger coil.
I calculated that a copper coil of 14mm internal diameter and a length of 20m long would have a volume of 3 litres. Mixing these 3 litres of hot water with another 3 litres of cold water will be enough for a shower.
Obviously, if there is still burning fuel in the firebox, the three litres of fresh cold water in the coil would also start to be heated. So while the coil would probably be poor in terms of providing constant hot water (probably wont pick up enough heat relative to the water flow) it should be able to provide hot water in batches.
Quite how easy it would be to neatly make a 20m coil of relatively large diameter copper pipe and then stuff it into a small cylinder is another matter! I suspect it would be a real challenge (and quite expensive if it goes wrong). So I will probably make a smaller, cheaper and easier coil in order to carry out a test. Here in the UK I can get a 10 metre coil of 10mm soft copper microbore tube for under £30, so that will be my starting point.
What if, after testing, the heat exchanger idea turns out to be completely impractical? Time for another plan B! In this case I could directly remove some of the heated water to fill up the shower sprayer, either via a drain tap or a simple hand pump.
The obvious problem with the steel cylinder is that of rusty bathing water. To mitigate this I could try coating the inside of the cylinder with some high temperature paint, such as engine enamel. Would it work? I don’t know, but it seems reasonable. The water in contact with the paint can’t get hotter than 100 deg C, so hopefully the paint itself wouldn’t get much hotter than this, despite the high temperatures on the other side of the metal. Another plus point is that I wouldn’t have to heat the water to near boiling point. Instead, a temperature of 40-45 deg C would be enough and this could hopefully be achieved with a less intense fire in the lower half of the heater.
So, to conclude this blog post, I have (a) a wood burning water heater design, (b) two methods of using the hot water for showering and (c) some contingency plans if the heat exchanger doesn’t work.
At the time or writing I have scavenged two old gas cylinders and have removed the valves and purged them with water. I’ve also bought some 75mm steel tube for the flue, some 30mm steel tube for the legs and some steel flat bar, nuts, bolts and washers. The next step is to build the heater and see how it performs.
I’ll report back in the blogpost “Free Hot Showers! Part 2: Water heater build and test”.
In this post I’ll explain why I chose to use a compost toilet and, more specifically, a simple biolitter type.
Water Savings
The waste of an expensive commodity like mains water was something I was keen to avoid. After washing, toilets are the biggest consumer of domestic water. A report by the Energy Saving Trust in 2013 found that 22% of water consumed in UK homes was used to flush toilets. Furthermore, it just seems crazy to use high quality drinking water to flush a toilet.
An alternative is to use a compost toilet. Having previously read about simple compost toilets (and seen them in use at an eco-centre) I decided early in the design process that I would use one for my tiny house.
Free Garden Compost
A further bonus is the recycling of human waste and kitchen scraps to make a high quality compost that can be used in the garden. To be fair, it’s not completely free as you normally have to buy the ‘biolitter’ (sawdust, wood shavings, etc) to which the waste is added. However, I had lots of hemp left over from the build which was ideal for this purpose.
The Biolitter Toilet
The compost toilet system I chose was popularized (in French speaking Europe at least) by Professor Joseph Országh of the Université de Mons-Hainaut in Belgium. He called his system the “toilette à litière biomaîtrisée” or TLB . This can be literally translated as “biocontrolled litter toilet” or “biolitter toilet” (BLT). US readers may be familiar with a similar system called Humanure proposed by the American Joseph Jenkins.
For the benefit of this website’s English speaking readers, I’ll stick with the term Biolitter toilet (or just compost toilet) and avoid the acronym BLT, for obvious reasons!
Whatever the name, the principle is the same. In place of a normal toilet is a bucket with a volume of 20-40 litres. Around the bucket is built some kind of containing ‘box’ with removable top. This top has a hole around which is fixed a toilet seat and lid.
After each visit to the toilet, the waste (solid and liquid) is covered by a layer of ‘litter’ which is typically wood chips, wood shavings or sawdust. The cellulose in the litter biologically inhibits the enzymatic reactions in the excreta that are responsible for odours. Nevertheless, the bucket should be emptied at least once per week.
The bucket’s contents are then composted for at least two years (along with kitchen food scraps etc) after which the compost is safe to use in the garden.
I briefly considered other types of compost toilet but they seemed to be more expensive and complicated. I didn’t see the point of buying a commercially made item when I could make a very simple, proven and low cost system myself.
The Biolitter toilet in practice
I used a home made outside biolitter toilet for two summers while the tiny house was being built. It was very simple and convenient. You can read about it here.
In the summer of 2021 I started using a biolitter toilet inside the tiny house. This time I used a plastic bucket type toilet with an integrated seat and lid and it was placed in the shower room. This toilet is very compact which was ideal for the small space available. In practice it has worked well. Even my teenage daughter has given it the thumbs up for it’s practicality and surprising lack of odour! She even says that she will use a compost toilet in her house when she is older.
The very first step was to build the concrete pad and pier foundations, which I describe in this post.
On the right is a photo of one of the six piers just after it had been filled with concrete.
It was important that this concrete was still soft as I would be driving some steel into the wet concrete to ‘pin’ the wooden frame to the foundations.
Floor beams
These are the large beams which sit on top of the concrete piers and support the floor joists. Like all the structural timber of the tiny house, the beams were made from Douglas Fir. Their sections were 70 x 200mm and the lengths were 4.8m (sides) and 3.6m (ends). The 4.8m lengths were supported in the middle by a concrete pier.
As for calculations, I think the floor beam size was simply suggested by Rob, the project’s ace carpenter, who knew from experience it would be sufficient.
Before putting the beams in place, I attached the joist hangers. It was easier to nail them on at this stage. I must say that the hangers were very easy to use. Just position them at the right depth, nail them on, then bend over the excess ‘tabs’ at the top. Remember to use the special twist nails that are made for them. Neither the hangers nor the nails are particularly expensive. I got mine from Screwfix in the UK and brought them with me for the build. These are the sort of items that you don’t want to be running around trying to find locally at the last minute.
Joist hangers attached to floor beams
Fixing the floor beam to the foundations
After nailing on the hangers, the floor beams were put on top of the concrete piers and joined using heavy duty, galvanized corner brackets.
A piece of steel rebar was driven into the wet concrete through a second angle bracket in order to ‘pin’ the floor beams to the concrete piers.
I was assured by Rob that this was good enough. The weight of the house means there is no need to bolt the floor beam down. We just need to prevent to beam from moving laterally relative to the concrete piers.
I didn’t use any damp proof membrane between the beam and the piers as I reckoned that the weatherboarding would prevent rainwater from getting to this area.
The photo below shows the installed floor beams ready to accept the joists.
Concrete piers with floor beams in place
Floor Joists and insulation
The floor joist section was 45 x 200mm and they were spaced at 60cm. You can find online calculators such as this one to help choose joist sizes and spacings according of the span and load of your project.
Installing the joists was simple, I just slotted them into the hangers and secured them with some screws.
Next I nailed some battens along the sides of the joists. I then loose fitted some wooden boards between the joists. These simply rested upon the battens and were necessary to retain the hempcrete insulation.
My Metabo mitre saw and stand combination.
This looks like a lot of work but it was actually done in an afternoon. Using the chop saw with the end stop meant that the boards could be cut to the exact length very quickly.
One mistake I made was to fit the boards together quite tightly.
I should have left an expansion gap of a few mm between the boards. After all, the boards were only acting as a kind of permanent shuttering.
What I later found was that mositure from the hempcrete caused the boards to expand and some of them buckled in a sort of concertina fashion. This wasn’t a major problem as the hempcrete remained in place, but it was a bit annoying all the same.
Anyway, the photo below shows the floor ready to receive the hempcrete.
Tiny house floor ready for hempcrete insulation
The hempcrete was simply wheelbarrowed up a ramp, tipped into the spaces between the joists and raked out. It was compacted slightly so as to leave an air gap between the top of the hempcrete and the chestnut flooring that would be laid on the joists.
I used a ‘lightweight’ hempcrete mix of 10 litres of lime, 50 litres of hemp and roughly 10 litres of water. In terms of buckets, this represents a ratio of 1:5:1 respectively.
This mix, which is relatively weak in lime, could be used as the hempcrete didn’t need to have any mechanical strength. All the floor loads were taken by the joists and beams. The lime did add a little bit of thermal mass though.
The photo below shows the hempcrete infill almost complete.
Wooden floor with hempcrete infiill.
OSB platform
I used tongue and grooved OSB sheets to cover the floor and provide a working platform for the rest of the build. From memory, the OSB was 22mm thick. I butted the sheets quite tightly together and screwed them in place. The photo below shows the floor at this stage.
Tiny house floor, ready for framing
Fitting the OSB was simple enough but I did have a problem later in that it expanded and caused a slight bump in the floor surface. This was rectified by cutting out the raised area and fitting a patch of new OSB in its place.
With hindsight I should also have glued the boards to the joists and ran some glue into the tongue and grooved joints. I would also have fitted them together less tightly. This might have stopped the buckling issue. Ideally though, I would have been able to wait until the hempcrete insulation had fully dried before fitting the OSB. Time constraints meant that I couldn’t.
Chestnut floorcovering
It was a full year later before the OSB floor ‘platform’ was covered by the final chestnut floor. By this time the tiny house had been built and the interior walls had been plastered and limewashed.
I chose the least expensive grade of solid chestnut from a local sawmill. This had a few more knots than the dearer stuff but still looked nice and went together just as easily. The boards were just over 20mm thick, came in bundles of various lengths and were tongue and grooved.
Fixing the chestnut floor board through its tongue.
Upon Rob’s advice the boards were screwed through the tongue into the joists in order to get a firm fixing that would minimise squeaks.
After a few tests, I found some woodscrews that were the right diameter and length to do the job. This system meant drilling a pilot hole and countersinking each screw, which was obviously slower than simply nailing the boards down. However, with 2 cordless drills, work progressed quickly enough.
Overall, laying the floor was quite straightforward. I left an expansion gap at the edges and used a scrap piece of board and a hammer to tap each board home before fixing. The boards that were cut at the end of one row were used to start the next row. Being accurately machined and super smooth, the boards didn’t need any sanding.
Laying the chestnut floor boards
In order to protect the floor I chose an eco friendly oil that was sold by the board manufacturer. This gave a clear finish and went on very nicely but I later found that it didn’t seem to offer a great deal of protection. This was disappointing as I had previously used similar oils with good results. Furthermore, the oil was quite expensive.
The floor oil and application brush
A few weeks later, I re-coated the floor but this time I used linseed oil. This is a natural product too but is much cheaper and is easily available in DIY shops and even some supermarkets in France. I highly recommend it. It’s important to add some drying agent to the oil, otherwise it could be sticky for a long time. I coated the floor with linseed oil in the morning and then went out for the day. Although the weather was very warm, the oil was still very slightly tacky when I got back at night. I just about got away with it! Ideally, I would have left it for 24 hours (if I had somewhere else to stay that night).
Although I had given the floor a good wash and let it dry before oiling, it was still somewhat stained from dirt being brought in from outside. That, plus the linseed oil, had the effect of darkening the floor slightly.
I was still happy with the final result, pictured below, and it’s completely in keeping with the rustic theme of the build.
The tiny house floor after treatment with linseed oil