In this post I will describe how I built a simple outside compost toilet that was used during the construction phase of the tiny house project.
I chose a compost toilet for simplicity, to save water and because my tiny house is not connected to any sewage network. You can read more about the ultra simple ‘biolitter’ toilet here.
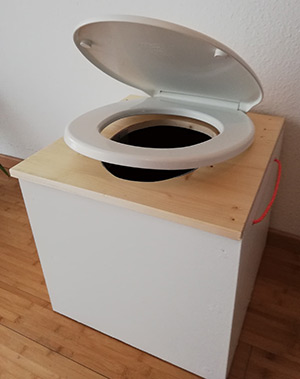
The image to the left shows my compost toilet setup. Building it was the first job I had to do!
As you can see, it consists of a box made from OSB. The top face of the box is removable and a large galvanised steel bucket is placed inside. I had to fix more OSB inside the box to raise height of the bucket to just under the top face. The last job was to cut a hole in the top and screw on a toilet seat.
Next to the toilet was placed a plastic bucket containing the compost ‘litter’. This has a lid to keep the litter dry and keep out creepy crawlies.
In order to keep the toilet stable on the uneven ground, I placed it on another piece of OSB.
Toilet Enclosure
The toilet was placed in a pop-up shower cubicle with a zip-up door.
I got mine from Decathlon ( a French outdoor products retailer).
The cubicle is quite handy in that it goes up very quickly and packs down into a small space. There is also a mesh pocket inside for putting shampoo, hand sanitizer etc.
I actually bought two cubicles and used the other one for the solar shower.
Each cubicle cost £49.99 which is ok. I considered building a toilet and shower enclosure from wood, but that would have cost more, taken longer and would eventually need to be dismantled and disposed of. The cubicles have been great in that they can be quickly installed and removed each time I visit the tiny house.
As the cubicle is open at the top, I used un umbrella to cover up the hole when the weather was bad. You could just as easily tie on some plastic sheet or material from an old tent.
Compost toilet litter
For the compost toilet litter, I initially bought a bale of wood shavings from a local agricultural co-op (these are very handy shops in rural France and you can buy all sorts of items: hardware, work clothing, garden items and even local food and drink).
Anyway, the wood shavings are said to be better than sawdust as there are more airspaces and so the compost is better aerated.
After each visit to the toilet we added a handful of litter and the bucket was emptied every day or two. After emptying I gave the bucket a good rinse with the garden hose, added a layer of litter and it was ready to be used again.
The wood shavings worked ok and lasted for most of the first summer (about 6 weeks). Later on I switched to using hemp as I had a large quantity left over from the tiny house build.
It turns out that hemp is well suited for use in compost toilets. I didn’t know it at the time, but hemp is also sold for use as animal bedding. One supplier claims that is is more absorbent than wood shavings or straw and is also good at reducing odours. I also learned recently that a Dutch company make public urinals that use hemp, the end result being an organic fertilizer. Apparently hemp composts quite easily.
So, hemp seems like the ideal stuff for my compost toilet and luckily I have loads of it lying around. So that’s what I will be using for quite a while!
The Compost Heap
My first compost heap was very quick, cheap and simple. I made it from reed garden screening that I screwed to 4 wooden posts hammered into the ground.
The base was about 0.8m square and the height about about 1.2m.
Besides the toilet waste, I also used added food scraps, waste paper and some cardboard.
Each time I added toilet waste onto the heap, I also added a bucket of dry hemp on top.
By the end of the summer, the heap was nearly full.
Some months later I noticed that the pile of compost had shrunk a little and when I turned the top layers over, there was steam coming from the middle. So its seems that the decomposition process was working.
Bad Smells?
Yes and no.
As the toilet cubicle was open at the top and the toilet itself had a lid, it wasn’t smelly in the toilet itself. At times it was used by me, my 2 children and my 2 step-children and nobody complained!
The compost heap did produce some odours though. Absorbent as the litter is, there always seems to be some urine at the bottom of the bucket. When emptying the bucket onto the compost heap, this liquid is then at the top. Although I did add a layer of dry hemp, there still tended to be a urine odour coming from the heap. It didn’t help that the compost heap was close to the house. Putting more dry hemp on the heap reduced the smell but also filled the heap up quickly.
In future I will locate the compost heap further from the house (but not too close to the neighbours!) and will make it a bit bigger so that I can add more dry hemp.
Next steps – An Inside Toilet
The next stage of the building process is to complete the shower room inside the tiny house. Apart from the shower, it will also have a compost toilet and a wash hand basin.
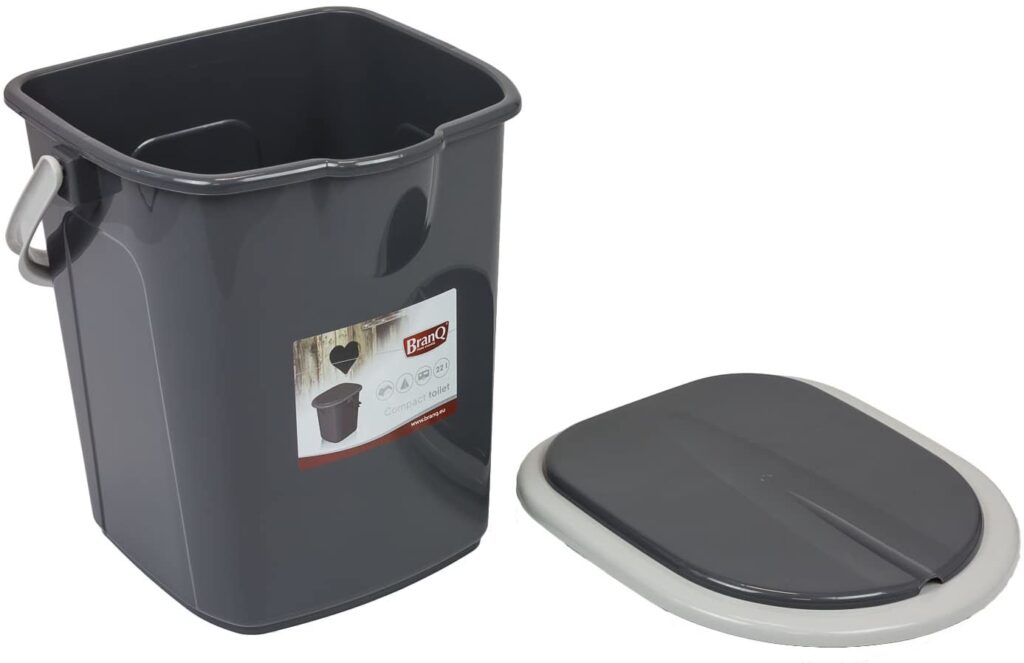
My plan was to build another compost toilet, albeit a more ‘attractive’ version, something like the one shown below.
However, I came across a ready made plastic camping toilet which looks worth a try.
At around £30, it’s not much more expensive than the price of a new toilet seat. It has the advantage of being less bulky than a home made ‘square box’. This could be a real bonus as the shower room is very small (little more than a cupboard). The shape looks like it would give more space for the user’s feet while sitting. It’s also a comfortable height (44.5cm). The 22 litre capacity should mean that I don’t have to empty it quite as often too.
So I went ahead and ordered one and will try it this summer. I also ordered some compostable plastic liners for the toilet. These will help keep the toilet clean and may also reduce odours from the compost heap if it gives the hemp a bit more ‘absorbing time’ before the bag decomposes. The risk is that they don’t actually decompose very well and/or they impede the aerobic process. I guess I’ll find out soon enough!
